

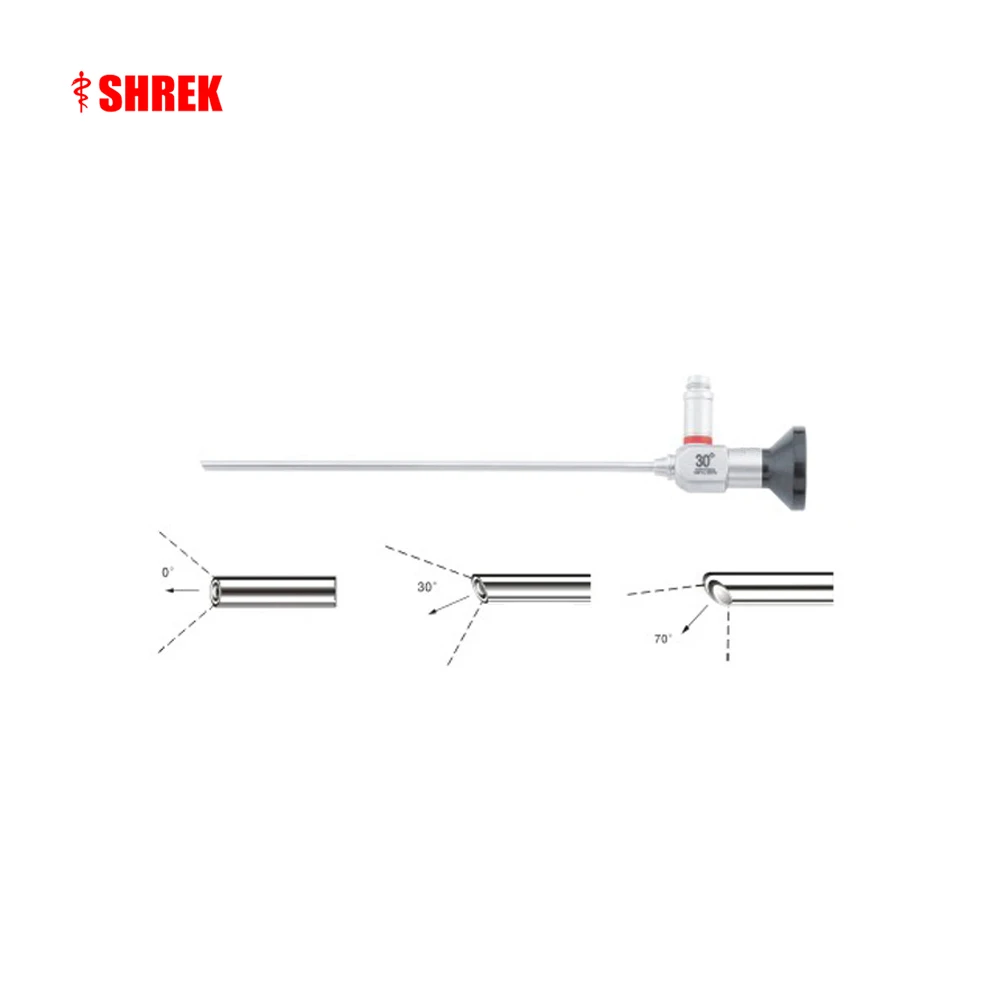
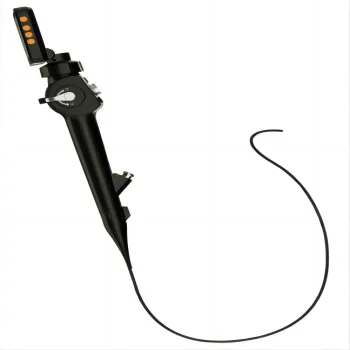
Product Overview
Description
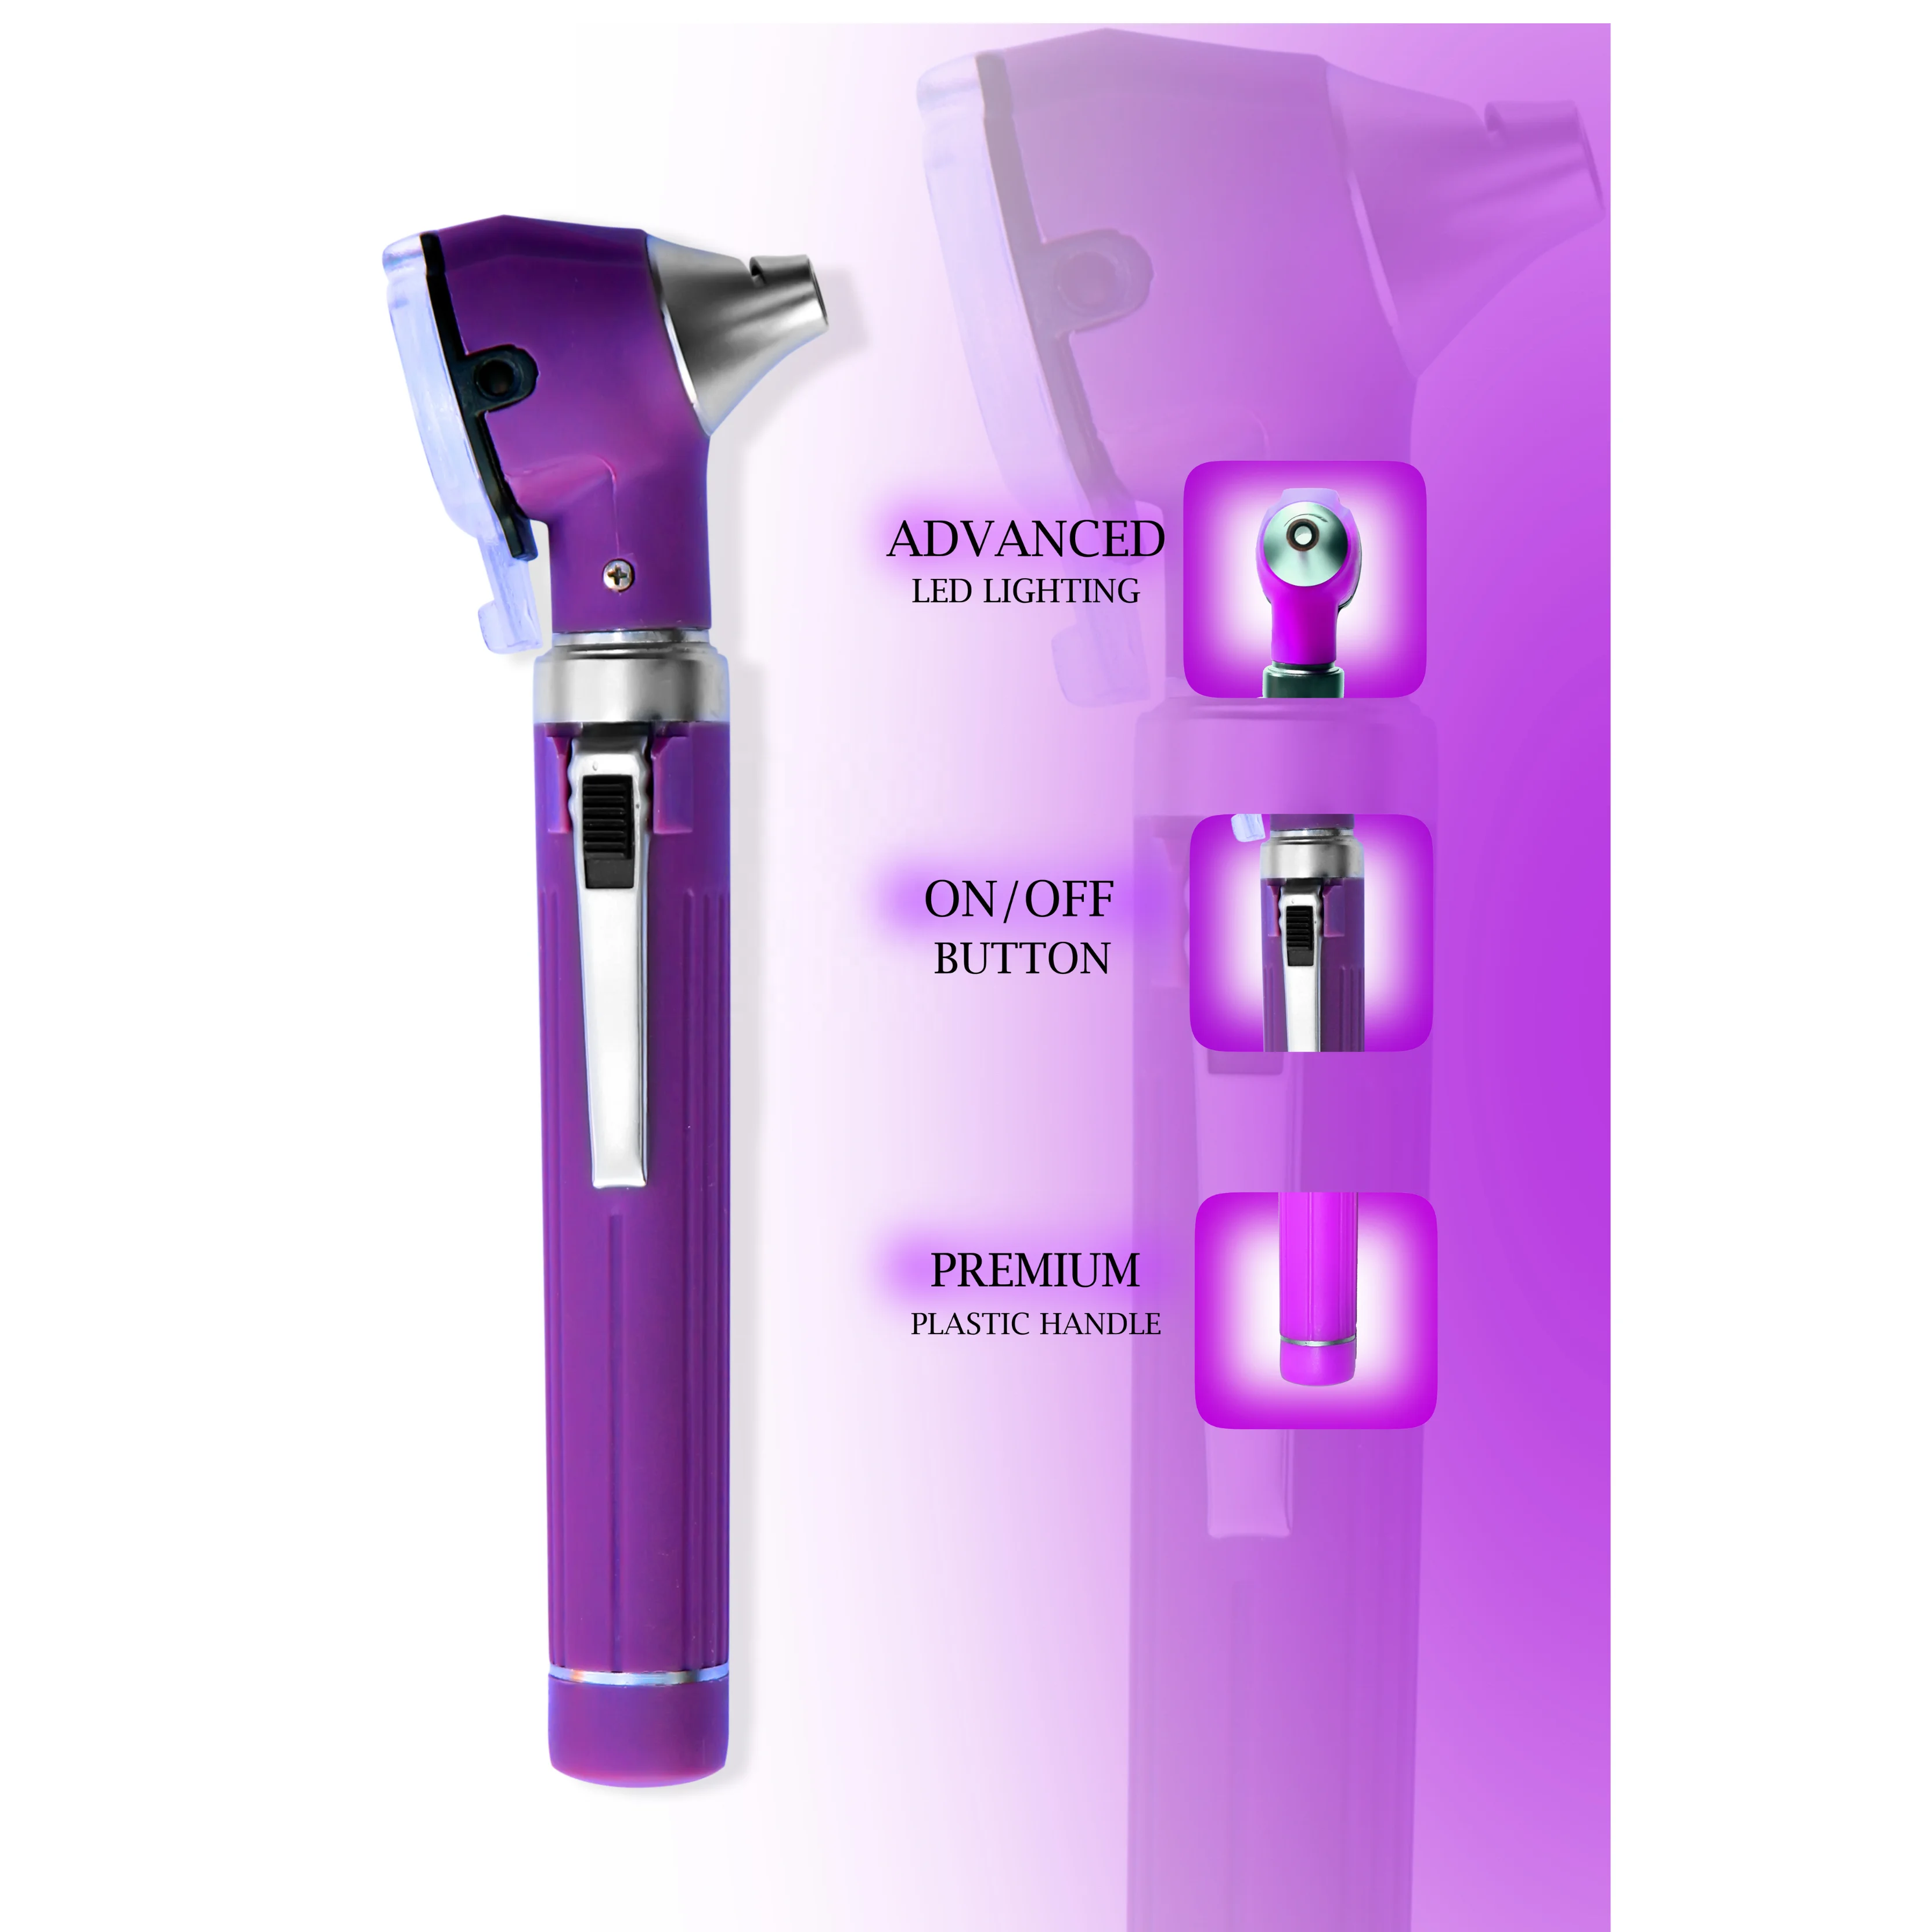
Professional Otoscope
A Professional otoscope is a basic, often more affordable, version of an otoscope designed for
educational purposes. It is typically used by medical and healthcare professionals for learning and
practicing the examination of the ear. An otoscope is a medical device with a light and a
magnifying lens, used to look into the ears.
The primary uses of a Professional otoscope include:
1. Ear Examination:To inspect the ear canal and tympanic membrane (eardrum) for signs of
infection, earwax build-up, foreign objects, or other abnormalities.
2. Learning Tool:To help Professionals become familiar with the anatomy of the ear and practice
diagnostic skills.
3. Training: Used in medical schools, nursing schools, and other healthcare training
programs to teach Professionals how to perform otoscopic examinations.
These otoscopes are often used in settings such as:
Medical and Nursing Schools: For educational purposes and hands-on training.
Clinical Skills Labs:Where professionals practice various examination techniques.
Simulation Centres:For simulating real-life scenarios where Professionals can practice their
skills.
Professional otoscopes are typically designed to be durable and user-friendly to facilitate the
learning process.
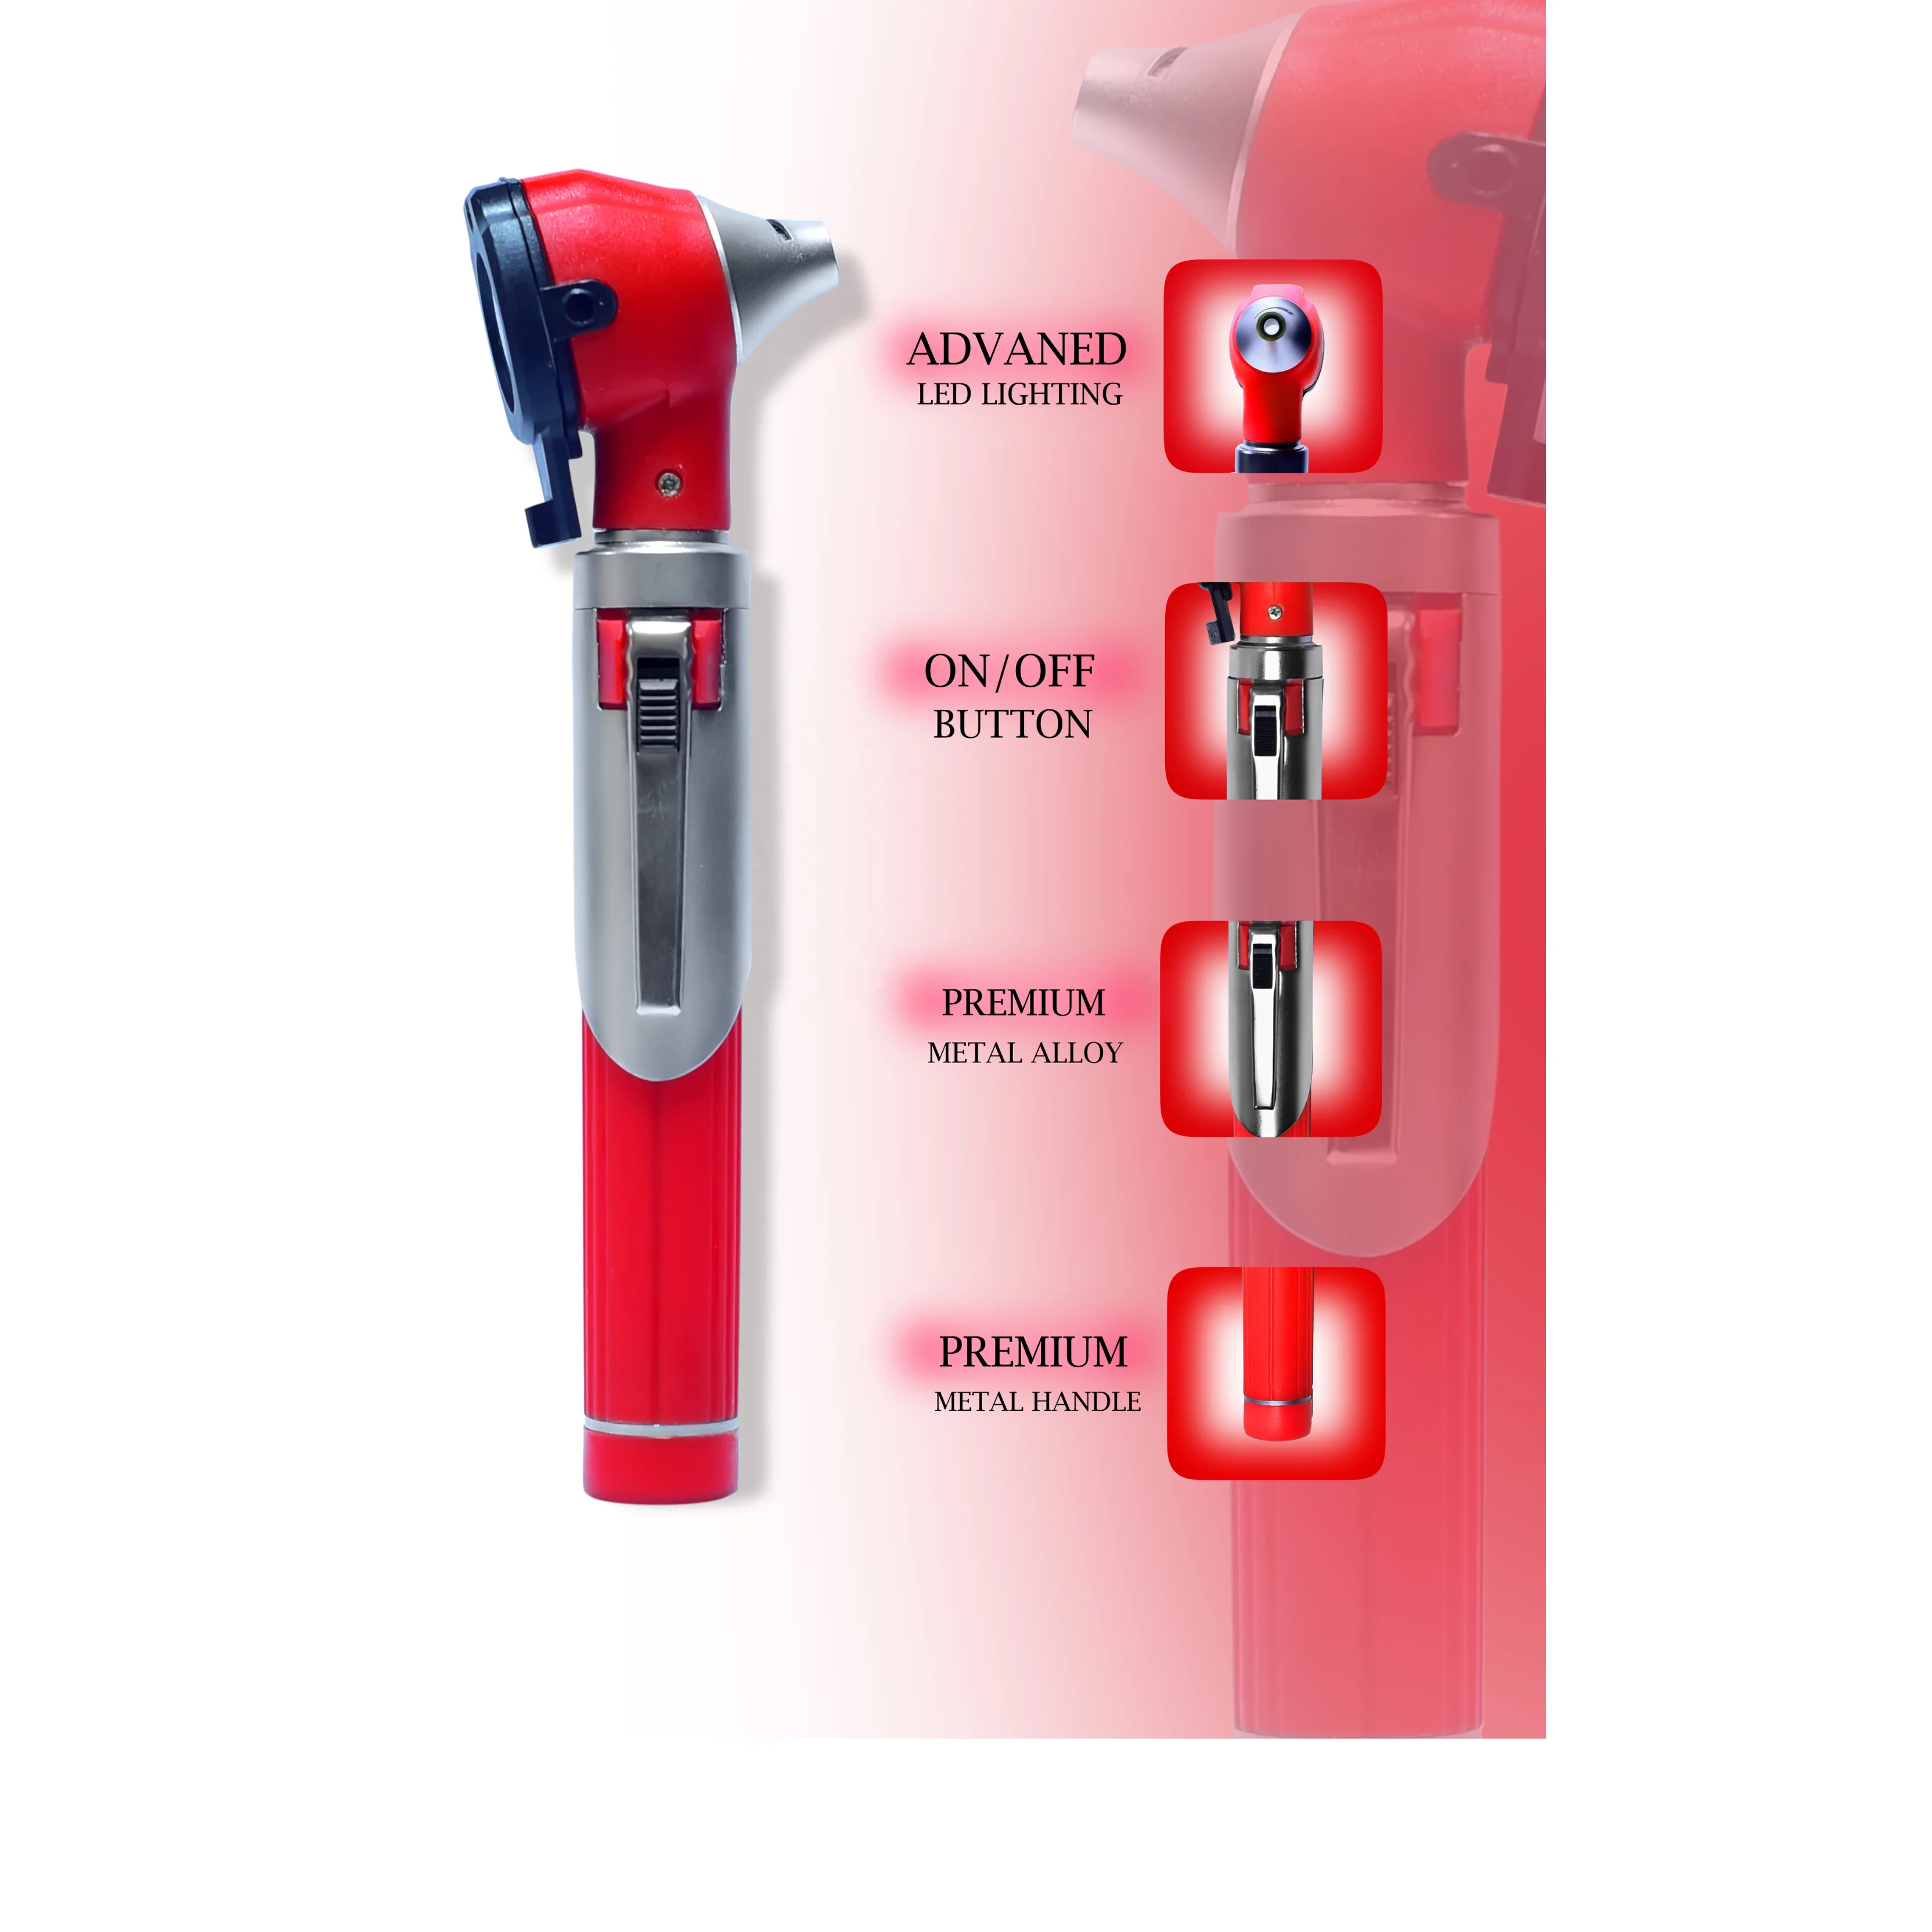
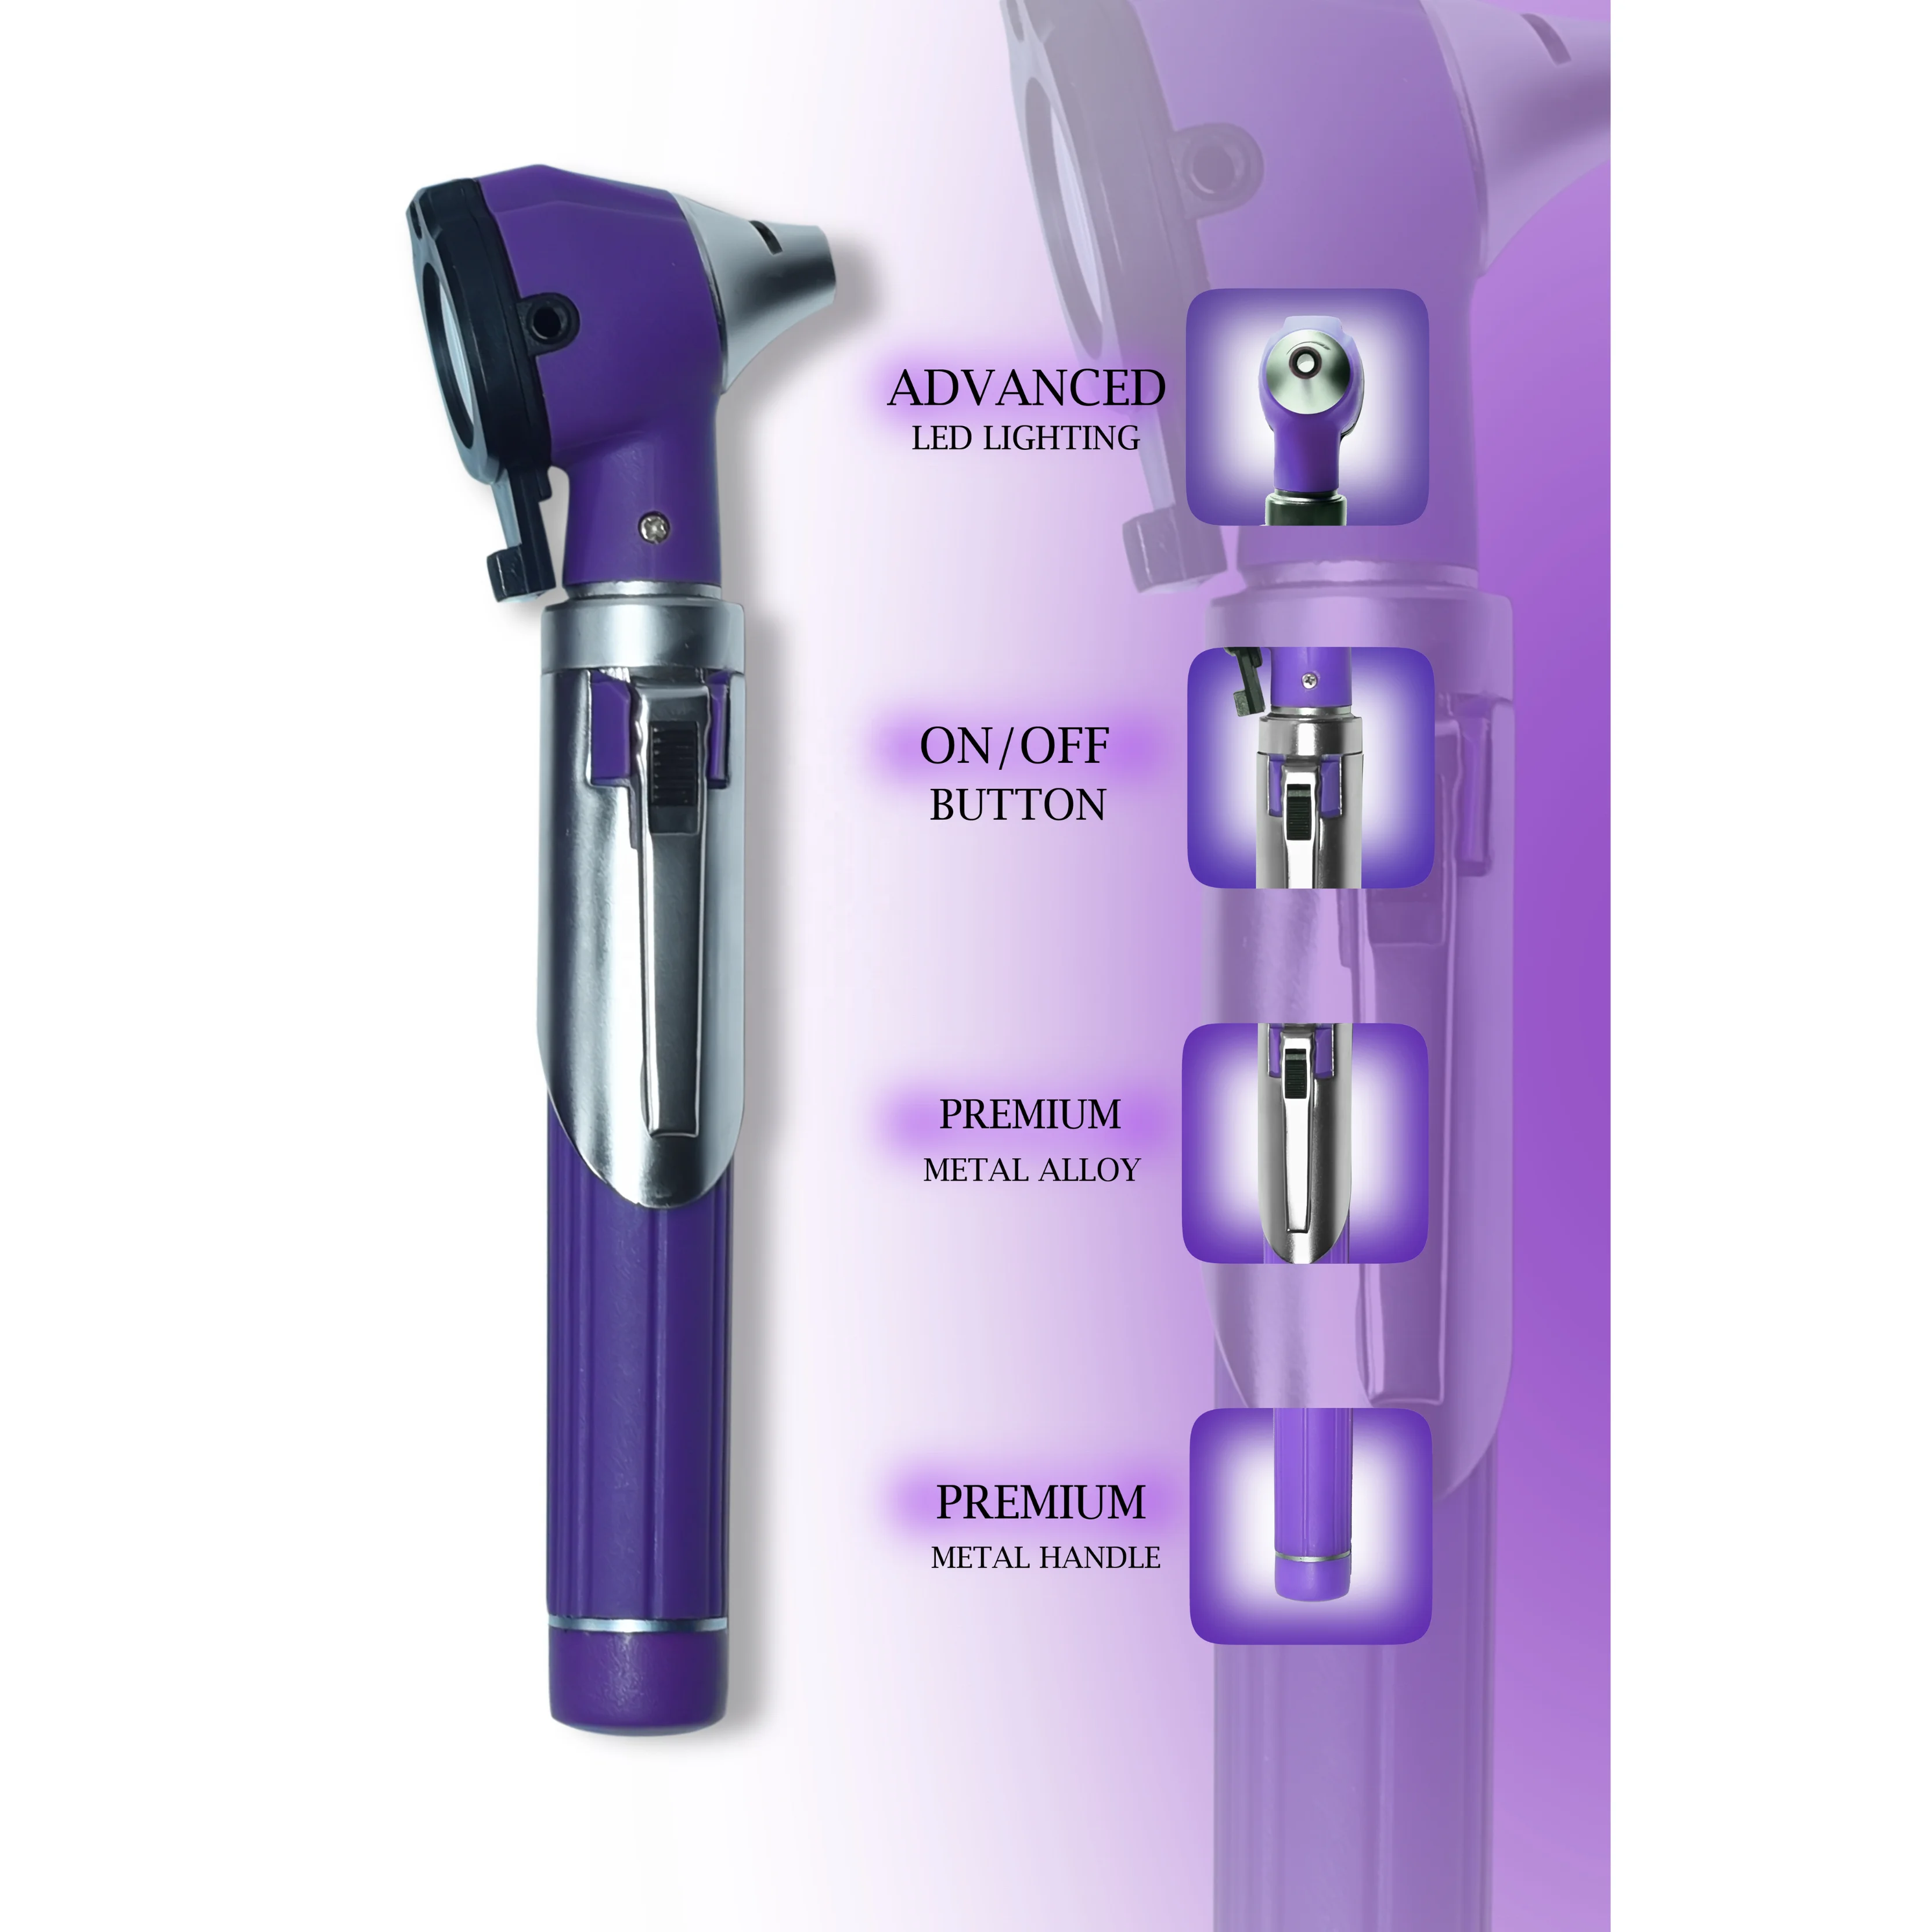
Components
An otoscope is a medical device primarily used to examine the ear canal and tympanic
membrane (eardrum). It consists of a handle and a head and typically includes a light source
and a magnifying lens to provide clear, detailed views of the ear's internal structures.
Components and Features
1. Handle:
Power Source: Houses batteries (disposable or rechargeable) or connects to a power
outlet.
Design:Ergonomic shape with a textured grip for comfortable use.
Controls:On/off button or switch to control the light, often with brightness adjustment.
2. Head:
Light Source: Often an LED or halogen bulb provides bright, white light.
Fibber Optic Light Transmission: Some models use fiber optics for even, shadow-free
illumination.
Magnifying Lens:Provides 3x to 4x magnification for detailed visualization.
Speculum Attachment:Holds various sizes of specula securely for different ear canal
sizes.
Insufflation Port: In pneumatic otoscopes, this allows air puffing to test eardrum mobility.
3. Specula:
Sizes:Typically range from 2.5 mm (infants) to 5 mm (adults).
Types: Disposable for hygiene or reusable after sterilization.
Key Points
Magnification Power: Typically, 3x to 4x.
On/Off Button:Located on the handle for easy light control.
Speculum Sizes:Ranging from 2.5 mm to 5 mm for different patient needs.
An otoscope is a versatile, essential tool in medical practice, providing crucial insights into ear
health and aiding in the diagnosis of various conditions.
Key Componentswith customization details
1. Handle:
Power Source: Contains batteries or is connected to a power outlet. It supplies power to
the light.
Ergonomic Design:Designed for a comfortable grip, allowing the examiner to maneuver
the otoscope easily.
2. Head:
Light Source: Provides illumination to see inside the ear canal. Modern otoscopes often
use LED lights for bright, consistent illumination.
Magnifying Lens: Magnifies the view of the ear canal and tympanic membrane, typically
by 3x or 4x, aiding in a detailed examination.
3. Speculum:
Disposable/Reusable Tips: The conical attachment that is inserted into the ear canal.
They come in various sizes to fit different ear canal sizes.
Sterility:Should be clean or sterilized to prevent infections.
4. Pneumatic Feature (Optional):
Air Bulb: Some otoscopes have a bulb to puff air into the ear canal. This helps assess the
mobility of the tympanic membrane, which is useful in diagnosing certain conditions.
The head of an otoscope is the functional part of the device that contains several critical
components essential for performing ear examinations. Here are the detailed aspects of the
otoscope head and its components:
Head Details
1. Light Source:
Bulb: The head contains a light bulb or LED that illuminates the ear canal. LEDs are
commonly used in modern otoscopes for their brightness, energy efficiency, and longevity.
Fibber Optics: Some otoscopes use fiber optic technology to deliver light from the bulb to
the tip of the speculum, providing bright, even illumination without obstructing the examiner’s
view.
2. Magnifying Lens:
Lens: A built-in magnifying lens is usually positioned at the top of the head. This lens
typically offers 3x to 4x magnification, allowing the examiner to see detailed views of the ear
canal and tympanic membrane (eardrum).
Swivel Lens: Some models have a lens that can be swiveled out of the way for
unobstructed access, useful when performing procedures like wax removal.
3. Speculum Attachment:
Speculum: The speculum is a cone-shaped attachment that is inserted into the ear canal.
The otoscope head is designed to hold various sizes of specula securely.
Disposable/Recyclable:Specula are often disposable to maintain hygiene, though
reusable ones are available and must be sterilized between uses.
4. Insufflation Port (Pneumatic Otoscopes):
Port for Air Bulb: Pneumatic otoscopes have an insufflation port on the head, allowing the
attachment of a rubber bulb. Squeezing the bulb sends a small puff of air into the ear canal to
test the mobility of the tympanic membrane, which can help diagnose conditions like otitis media
with effusion.
5. Viewing Window:
Clear View: The head includes a clear viewing window through which the examiner looks.
This window is aligned with the light source and magnifying lens to provide a well-illuminated,
magnified view of the ear canal.
light sources commonly used in otoscope heads:
Types of Light Sources
1. Incandescent Bulbs:
Traditional Light:Earlier otoscope models used incandescent bulbs, which produce a
warm, yellowish light.
Shorter Lifespan:These bulbs have a relatively short lifespan and need to be replaced
more frequently compared to modern light sources.
Heat Production: Incandescent bulbs can generate a significant amount of heat, which
might cause discomfort during prolonged examinations.
2. Halogen Bulbs:
Bright and White Light: Halogen bulbs offer brighter and whiter light compared to
incandescent bulbs, providing better illumination and more accurate color representation of the
ear structures.
Longer Lifespan: They have a longer lifespan than incandescent bulbs but still require
periodic replacement.
Heat: Halogen bulbs also produce some heat, though less than incandescent bulbs.
3. LED (Light Emitting Diode) Lights:
High Brightness and Efficiency: LEDs provide bright, white light that closely mimics
natural daylight, ensuring clear and accurate visualization of the ear canal and eardrum.
Energy Efficiency:LEDs are highly energy efficient, consuming less power than
incandescent or halogen bulbs, which extends battery life in portable otoscopes.
Long Lifespan: LEDs have an exceptionally long lifespan, often lasting tens of thousands
of hours, reducing the need for frequent replacements.
Cool Operation: LEDs produce very little heat, making them comfortable for both the
examiner and the patient during extended use.
4. Fibber Optic Light Transmission:
Even Illumination: In some advanced otoscopes, fiber optic cables are used to transmit
light from the bulb to the tip of the speculum. This provides even, shadow-free illumination of the
ear canal and tympanic membrane.
Placement: The light source (often an LED or halogen bulb) is positioned away from the
viewing area, with fibber optics delivering the light to the examination site.
Advantages of LED Light Sources
Brightness and Clarity:LEDs provide a clear and bright light, which is crucial for detailed
examinations.
Accurate Colour Representation: The white light produced by LEDs helps in accurately
assessing the color and condition of the tympanic membrane and ear canal.
Low Maintenance: With their long lifespan, LEDs reduce the need for frequent
replacements and maintenance.
Cool and Comfortable: The minimal heat generation makes LEDs comfortable for patients,
even during longer examinations.
Energy Efficient:LEDs use less power, making them ideal for battery-operated otoscopes,
ensuring longer operational times between charges or battery changes.
In summary, the main light source in modern otoscope heads is typically an LED, chosen for its
brightness, energy efficiency, long lifespan, and cool operation. These characteristics make
LEDs are superior to traditional incandescent and halogen bulbs, providing optimal illumination for
effective ear examinations.
otoscopes offer a magnification power of around 3x, which provides a detailed and clear view of
the ear canal and tympanic membrane (eardrum).
Key Points About Magnification Power:
1. Standard Magnification:
3x Magnification: This is the most common magnification level for otoscopes. It strikes a
good balance between providing sufficient detail and maintaining a wide enough field of view to navigate and examine the ear canal easily.
2. Range of Magnification:
2x to 4x Magnification: Otoscopes may offer magnification within this range. Higher
magnification provides more detailed views but can reduce the field of view, making it slightly
more challenging to examine larger areas quickly.
Benefits of Magnification in Otoscopes:
1. Detailed Visualization:
The magnifying lens allows healthcare providers to see fine details within the ear canal and
on the tympanic membrane. This helps in identifying small abnormalities, such as tiny
perforations, subtle signs of infection, or early stages of earwax build-up.
2. Improved Diagnosis:
Enhanced magnification aids in accurate diagnosis by providing a clearer and more detailed
view of the ear structures. This can be critical for detecting conditions like otitis media, otitis
externa, and other ear pathologies.
3. Educational Use:
For medical professionals and trainees, the magnification helps in learning and understanding the
anatomy of the ear as well as recognizing various ear conditions.
Conclusion:
The typical magnification power of an otoscope lens is around 3x, with a general range of 2x to
4x. This magnification level is sufficient to provide detailed visualization of the ear canal and
tympanic membrane, aiding in accurate diagnosis and effective examination.
The cannula (or speculum) sizes that come with an otoscope vary to accommodate different ear
canal sizes, ranging from infants to adults. Here are the typical sizes of specula provided with an
otoscope:
Common Speculum Sizes
1. Infant Speculum:
Size: Usually around 2.5 mm in diameter.
Use: Specifically designed for the small ear canals of infants and very young children.
2. Paediatric Speculum:
Size: Typically, around 3 mm to 4 mm in diameter.
Use: Suitable for examining the ears of older children and young adolescents.
3. Adult Speculum:
Size: Generally, around 4 mm to 5 mm in diameter.
Use: Designed for use in adult patients with larger ear canals.
Special Considerations
1. Wide Range Sets:
Many otoscope kits come with a set of specula that includes a range of sizes (e.g., 2.5 mm, 3
mm, 4 mm, 5 mm) to ensure that healthcare providers can select the appropriate size based on
the patient's age and ear canal size.
2. Disposable vs. Reusable:
Disposable Specula:These are single-use specula that are discarded after each patient
to maintain hygiene and prevent cross-contamination.
Reusable Specula:These can be sterilized and reused. They are typically made of more
durable materials and are cost-effective over time.
3. Specialty Specula:
Some otoscopes may come with specialty specula for specific purposes, such as longer
specula for deeper ear examinations or pneumatic specula used in conjunction with a pneumatic
otoscope to assess tympanic membrane mobility.
Choosing the Right Size
Infants and Small Children: Use the smallest sizes (2.5 mm to 3 mm) to ensure a
comfortable and safe examination without causing discomfort.
Older Children and Adolescents: Medium sizes (3 mm to 4 mm) are typically appropriate.
Adults: Larger sizes (4 mm to 5 mm) provide a good fit for adult ear canals, allowing for
optimal visualization without being too tight.
On/Off Button Features
1. Location:
Handle: The on/off button is commonly situated on the handle of the otoscope. This
placement makes it convenient for the user to switch the device on or off with their thumb while
holding the otoscope.
2. Types of Controls:
Push Button: A simple push button that toggles the light on and off with each press.
Rotary Switch: Some otoscopes feature a rotary switch that you turn to activate the light.
This type can also offer variable brightness control.
Slide Switch: A sliding mechanism that moves up or down to turn the light on or off.
3. Additional Functions:
Brightness Control: Some models include a feature where the same button or an
additional control allows you to adjust the brightness of the light.
Power Indicator: Advanced otoscopes might have an indicator light to show when the
the device is powered on to display battery levels.
Materials
The handle of an otoscope is a crucial component that houses the power source and provides
the user with a grip for maneuvering the device. Here are the detailed aspects of the handle and
the materials typically used:
Handle Details
1. Power Source:
Battery-operated: Many otoscopes are powered by batteries, which can be disposable
(Such as AA or AAA batteries) or rechargeable. Rechargeable handles often come with a
charging station.
Direct Power: Some models can be plugged directly into an electrical outlet, providing a
continuous power supply. This is common in clinical settings where the otoscope is frequently
used.
2. Design and Ergonomics:
Ergonomic Shape: The handle is usually designed to fit comfortably in the hand, allowing
for precise control and ease of use during the examination.
Grip: Some handles have a textured or rubberized surface to prevent slipping and ensure
a firm grip.
3. Controls:
Power Switch: A switch or button to turn the light on and off.
Brightness Control: Some advanced models have adjustable brightness settings to
provide the right amount of illumination based on the examination needs.
Materials Used
1. Plastic:
Lightweight and Durable: High-quality, medical-grade plastic is commonly used for its
durability, lightweight, and ease of cleaning.
Cost Effective: Plastic handles are often more affordable, making them a popular choice
for Professional and portable otoscopes.
2. Metal:
Stainless Steel or Aluminium: These metals are used for their strength, durability, and
resistance to corrosion. Metal handles are often found in high-end otoscopes and are built to
withstand frequent use.
Heavier:Metal handles tend to be heavier than plastic ones, which can provide a more
substantial feel in the hand but may be less comfortable during prolonged use.
3. Rubber or Silicone:
Grip Enhancement: These materials are sometimes used to cover the handle, providing a
nonslip surface for better control and comfort during the examination.
4. Composite Materials:
Hybrid Designs: Some handles use a combination of materials, such as a metal core for
durability with a plastic or rubber outer layer for improved ergonomics and grip.
Additional Features
1. Rechargeable Battery Pack:
Ecofriendly: Reduces the need for disposable batteries and is more cost-effective over
time.
Charging Indicator:Often includes an indicator to show the battery level and charging
status.
2. Modular Design:
Interchangeable Heads: Some handles are designed to accommodate different types of
examination heads, such as otoscope heads, ophthalmoscope heads, and other diagnostic tools,
enhancing versatility.
3. Built-in Charging:
USB or Docking Station: Some modern handles include USB ports for charging or come
with docking stations that charge the otoscope when not in use.
In summary, the handle of an otoscope is designed to provide power to the light source, ensure a
comfortable and secure grip for the user, and may include additional features for enhanced
functionality and convenience. The materials used in the construction of the handle play a
significant role in the device's durability, weight, and ergonomics.
Materials Used
1. Plastic:
Durability and Light Weight: High-quality, medical-grade plastic is often used for its
durability, lightweight, and ease of cleaning.
Cost Efficiency: Plastic heads are typically more affordable and common in Professional or
portable otoscopes.
2. Metal:
Stainless Steel or Aluminium: These metals are chosen for their strength, durability, and
resistance to corrosion. Metal heads are more common in high-end or professional-grade
otoscopes.
Heavier: Metal heads provide a more substantial feel, which some practitioners prefer for
its robustness.
3. Glass:
Magnifying Lens: The magnifying lens is often made of high-quality optical glass to
provide clear and precise magnification without distortion.
Durability: Glass lenses are durable and resistant to scratches, ensuring long-term clarity
and performance.
Assembly and Operation
1. Assemble the Otoscope:
Attach the Head to the Handle: Securely connect the otoscope head to the battery
handle. This connection enables the power from the batteries to reach the light source in the
head.
Check for Secure Fit: Ensure that the head is firmly attached to the handle to prevent any
disconnections during the examination.
2. Power on the Otoscope:
Activate the Light:Turn on the otoscope using the power switch on the handle. This
a switch allows the electrical power from the batteries to activate the light source (typically an LED
or halogen bulb) in the head of the otoscope.
Adjust Brightness (if applicable): Some otoscopes have a brightness control feature.
Adjust the brightness to a comfortable level for optimal visibility.
3. Attach a Speculum:
Choose the Appropriate Size: Select a speculum that fits the patient's ear canal
comfortably. Attach the speculum to the otoscope head. Ensure it is secure but not overly tight.
Check for Cleanliness: Use a new or sterilized speculum for each patient to maintain
hygiene.
Ear Examination
Performing an ear examination with an otoscope involves several steps to ensure a thorough and
accurate assessment. Here is a step-by-step guide:
Preparation
1. Gather Equipment:Ensure you have a working otoscope with a clean speculum (the part
that enters the ear canal).
2. Wash Hands:Proper hand hygiene is crucial before and after the examination.
3. Explain the Procedure: Inform the patient about what you are going to do to reduce anxiety
and gain their cooperation.
Examination
1. Position the Patient: Ask the patient to sit upright and tilt their head slightly away from the
ear being examined. For children, it may be helpful to have them sit on a parent's lap.
2. Inspect the Outer Ear: Look for any abnormalities, such as swelling, redness, discharge, or
deformities.
3. Choose the Right Speculum: Select a speculum that is the appropriate size for the
patient’s ear canal and attach it to the otoscope.
4. Turn on the Otoscope Light: Make sure the light is bright and steady.
Ear Canal Examination
1. Insert the Speculum: Gently pull the outer ear (auricle) upward and backward for adults
(Downward and backward for children) to straighten the ear canal.
2. Insert the Otoscope: Carefully insert the speculum into the ear canal, slightly rotating if
necessary to view different parts of the canal.
3. Examine the Ear Canal: Look for signs of infection, wax build-up, foreign bodies, or other
abnormalities. The canal should be clear and pinkish.
Tympanic Membrane Examination
1. Find the Eardrum:Gently advance the otoscope to visualize the tympanic membrane
(eardrum).
2. Inspect the Eardrum: Check for color (should be pearly Gray), position (should be slightly
concave), and landmarks (such as the cone of light and malleus). Look for signs of infection,
perforation, or fluid behind the membrane.
Performing the Ear Examination
1. Prepare the Patient:
Explain the Procedure:Inform the patient about what you are going to do to help them
relax and cooperate.
Position the Patient:Ask the patient to sit upright and tilt their head slightly away from
the ear being examined. For children, it might be helpful to have them sit on a parent's lap.
2. Examine the Outer Ear:
Inspect Visually:Before using the otoscope, look at the outer ear for any visible
abnormalities, such as redness, swelling, or discharge.
3. Examine the Ear Canal and Tympanic Membrane:
Insert the Speculum:Gently pull the outer ear upward and backward for adults (downward
and backward for children) to straighten the ear canal.
Insert the Speculum Carefully: Slowly and gently insert the speculum into the ear canal.
Rotate it slightly to get a clear view of the ear canal and tympanic membrane.
Illuminate and Magnify:Use the light and magnifying lens of the otoscope to examine the
ear canal and tympanic membrane. Look for signs of infection, wax build-up, perforations, foreign
bodies, or other abnormalities.
4. Document Findings:
Record Observations: Note any findings, such as the presence of wax, signs of infection,
or other abnormalities, in the patient's medical record.
Provide Feedback: Inform the patient about what you observed and discuss any
necessary follow-up actions or treatments.
Using an Otoscope
1. Preparation:
Assemble: Attach the head to the handle and secure a speculum.
Turn On: Activate the light source using the on/off button on the handle.
2. Examination:
Position the Patient:Have the patient sit upright with their head tilted.
Inspect the Outer Ear:Look for visible abnormalities.
Insert the Speculum:Gently pull the outer ear and insert the speculum into the ear canal.
View Inside: Look through the magnifying lens, adjusting the angle to examine the ear
canal and eardrum for signs of infection, wax build-up, or other issues.
3. Post Examination:
Turn Off: Switch off the otoscope to conserve battery life.
Clean: Dispose of or sterilize the speculum and clean the otoscope if needed.
Document Findings: Record observations in the patient's medical record.
Additional Uses
While primarily for ear examinations, otoscopes with appropriate attachments can also be used
for nasal examinations, throat visualization, and, in some diagnostic sets, as an ophthalmoscope
or dermatoscopy.
An otoscope is primarily designed for ear examinations, but it can also be adapted or used in
combination with other tools for additional purposes. Here are some of the other uses and
adaptations of an otoscope:
Other Uses of an Otoscope
1. Nasal Examination:
Speculum Adaptation: By attaching a nasal speculum to the otoscope, it can be used to
examine the nasal passages for signs of infection, inflammation, polyps, or other abnormalities.
2. Throat Examination:
Indirect Lighting: While not specifically designed for throat examinations, an otoscope
can provide indirect lighting to help visualize the throat. Some models may have accessories or
attachments that facilitate this use.
3. Ophthalmoscopic Examination:
Ophthalmoscope Attachment: Some otoscopes are part of a diagnostic set that includes
an ophthalmoscope head. By switching the otoscope head with an ophthalmoscope head, the
device can be used to examine the eyes, specifically the retina and other internal structures.
4. Dermatoscopic Examination:
Dermatoscope Attachment: Certain models can be adapted with a dermatoscopy
attachment to examine skin lesions, moles, and other dermatological conditions.
Using the on/Off Button
1. Turning On:
Press or Slide: Depending on the model, press the button, turn the rotary switch, or slide
the switch to the “on” position. The light should illuminate, indicating that the otoscope is ready
for use.
2. Turning Off:
Press or Slide Again:To turn off the light, press the button again, turn the rotary switch to
the “off” position, or slide the switch back. Ensure the light is off to save battery life.
Importance of the on/Off Button
1. Energy Conservation:
Turning off the otoscope when not in use helps conserve battery power, extending the life of
the batteries or the time between recharges for rechargeable models.
2. Convenience:
Easy access to the on/off button allows for quick activation and deactivation, making the
examination process is smoother and more efficient.
3. Safety:
Ensuring the light is off when not in use prevents accidental overheating and preserves the
longevity of the light source, especially in models using halogen bulbs.
In summary, otoscopes come equipped with an on/off button or switch located on the handle for
easy and convenient control of the light source. This feature is essential for efficient operation,
energy conservation, and ensuring the device is only used when needed.
Otoscope Overview
Practical Tips
Comfort and Safety:Always choose the speculum size that fits comfortably in the patient's
ear canal. Forcing a speculum that is too large can cause discomfort or injury.
Visualization: A speculum that is too small may not provide the best view and can make the
examination more challenging.
Hygiene: Ensure that disposable specula are used once per patient and that reusable
specula are properly sterilized between uses to prevent infections.
In summary, otoscopes typically come with a variety of speculum sizes ranging from about 2.5
mm to 5 mm in diameter, suitable for different age groups and ear canal sizes. Selecting the
correct size is crucial for a safe, comfortable, and effective ear examination.
Yes, otoscopes typically have an on/off button or switch to control the light source. This button is
usually located on the handle of the otoscope, allowing easy access for the examiner. Here are
the key details about the on/off button:
Tips
Be gentle to avoid causing discomfort or injury to the ear canal.
Use a distraction technique, especially with children, to keep them calm during the
examination.
Familiarize yourself with normal ear anatomy and common pathologies to improve diagnostic
accuracy.
This procedure helps in identifying ear infections, blockages, and other ear-related issues
effectively.
The key points of an otoscope include its main components and their specific functions, which
facilitate the examination of the ear. Here are the essential aspects:
Tips for Effective Use
1. Proper Technique:Gently pull the outer ear upward and backward for adults (downward
and backward for children) to straighten the ear canal for better visualization.
2. Choosing the Right Speculum Size: Select a speculum that fits comfortably in the patient's
ear canal to avoid discomfort and ensure a clear view.
3. Maintaining Hygiene: Always use clean or sterilized specula to prevent infections.
4. Adequate Lighting: Ensure the light source is bright and working correctly to provide a
clear view of the ear canal and tympanic membrane.
By understanding these key points, healthcare providers can effectively use an otoscope to
examine patients' ears, leading to accurate diagnoses and appropriate treatment plans.
Post Examination
1. Turn Off the Otoscope:
Switch Off: Turn off the otoscope to preserve battery life.
Disassemble and Clean:Remove the speculum and either dispose of it (if disposable) or
sterilize it for future use. Clean the otoscope as needed.
2. Store Properly:
Safe Storage: Store the otoscope in a clean, dry place. If it has a charging station, place
the otoscope handle in the charger to ensure it is ready for the next use.
By following these steps, you can effectively use an otoscope to examine the ear, identify
potential issues, and provide appropriate medical care.
Aftercare
1. Discuss Findings:Explain any findings to the patient and provide appropriate advice or
follow up if needed.
2. Clean Equipment:Clean the otoscope and dispose of or disinfect the speculum according
to infection control guidelines.
Functions & Features
Key Functions
1. Visualizing the Ear Canal and Tympanic Membrane:
The otoscope allows the examiner to see the ear canal and eardrum clearly, aiding in the
diagnosis of infections, wax build-up, and other issues.
2. Assessing Ear Health:
By providing a magnified and illuminated view, the otoscope helps in detecting abnormalities
like perforations, fluid build-up, redness, swelling, and foreign bodies.
3. Diagnosing Ear Conditions:
Common conditions diagnosed using an otoscope include otitis media (middle ear infection),
otitis externa (outer ear infection), earwax impaction, and tympanic membrane perforations.
4. Educational Tool:
Widely used in medical training to teach Professionals about ear anatomy and how to recognize
various ear conditions.
Key Functions
1. Illumination:
The head provides bright, focused illumination into the ear canal, essential for a clear view of
the ear's interior structures.
2. Magnification:
The magnifying lens enhances the view, allowing for detailed examination of the ear canal and
tympanic membrane to identify abnormalities such as infections, wax buildup, perforations, or
foreign bodies.
3. Speculum Holding:
The head securely holds the speculum in place, allowing safe and comfortable insertion into
the ear canal.
4. Pneumatic Functionality (if applicable):
The insufflation port allows for the assessment of tympanic membrane mobility, providing
additional diagnostic capability for conditions affecting middle ear pressure.
In summary, the head of an otoscope is a complex, integral part of the device that includes the
light source, magnifying lens, speculum attachment, and sometimes an insufflation port. These
components work together to provide a clear, magnified, and well-illuminated view of the ear
canal and eardrum, facilitating accurate diagnosis and treatment of ear-related conditions.
The main light source in an otoscope head is critical for providing the necessary illumination to
examine the ear canal and tympanic membrane effectively. Here are the details regarding the
A fibber otoscope, often referred to as a fibber optic otoscope, is a type of otoscope that utilizes
fiber optic technology to provide superior illumination for examining the ear canal and tympanic
membrane. Here are the key details about fibber otoscopes:
Key Features of a Fibber Otoscope
1. Fibber Optic Light Transmission:
Even Illumination: Fibber optic cables are used to transmit light from the source to the tip
of the otoscope. This results in even, shadow-free illumination, which is critical for clear and
detailed examination.
Placement of Light Source: The light source, often an LED or halogen bulb, is placed
away from the viewing area, with fibber optics delivering the light precisely where it is needed.
2. Bright and Clear Light:
Enhanced Visibility:The use of fiber optics ensures a bright, white light that closely
mimics natural daylight. This provides better visibility and a more accurate color representation of
the ear structures.
Consistent Illumination: The light is distributed evenly along the fiber optics, ensuring
that the entire viewing area is well-lit without shadows or dark spots.
3. Improved Ergonomics:
Comfortable Use: The design of fibber otoscopes often includes ergonomic features to
make them comfortable to hold and use for extended periods. The light source being placed
away from the viewing area also reduces the bulk of the otoscope head.
Heat Reduction: Fibber optics help minimize heat transfer to the otoscope head, making it
more comfortable for patients during examinations.
4. Pneumatic Capability (Optional):
Insufflation Port: Some fibber otoscopes come with an insufflation port, allowing the use of
a pneumatic bulb to test the mobility of the tympanic membrane by puffing air into the ear canal.
Advantages of Fibber Otoscopes
1. Superior Illumination:
Clear View: The fibber optic technology provides bright and evenly distributed light,
improving the clarity of the view and making it easier to detect abnormalities.
No Obstruction: The light source is positioned outside the viewing area, ensuring that
there are no obstructions or shadows in the field of view.
2. Enhanced Diagnostic Accuracy:
Detailed Examination:The improved lighting and clear view allow for more accurate
diagnosis of ear conditions, such as infections, wax build-up, perforations, and other
abnormalities.
Color Accuracy: The white light provided by fibber optics ensures that the colors of the ear
canal and tympanic membrane are represented accurately, aiding in the assessment of their
condition.
3. Durability and Maintenance:
Long-lasting: Fibber optic otoscopes, especially those with LED light sources, are durable
and require less frequent maintenance and bulb replacement.
Energy Efficient: LED-powered fibber otoscopes are energy efficient, making them ideal
for battery-operated models, extending battery life and reducing operational costs.
Typical Uses
Clinical Settings: Fibber otoscopes are commonly used in clinics and hospitals due to their
superior illumination and diagnostic capabilities.
Primary Care: General practitioners and pediatricians frequently use fibber otoscopes for
routine ear examinations.
Specialized Care: ENT (ear, nose, and throat) specialists rely on fibber otoscopes for
detailed examinations and accurate diagnosis of ear-related conditions.
In summary, a fiber otoscope utilizes fiber optic technology to provide superior, even illumination
for ear examinations. This technology enhances visibility, diagnostic accuracy, and patient
comfort, making fiber otoscopes a preferred choice in both general and specialized medical
settings.
Yes, after assembling the head and the battery handle of an otoscope, the device produces light,
allowing you to perform an ear examination. Here’s a step-by-step explanation of the process:
Specific Tool Combinations
1. Diagnostic Sets:
Comprehensive Kits: Many medical diagnostic sets include interchangeable heads for
otoscopy, ophthalmoscopy, dermatoscopy, and sometimes nasal examinations. These sets
provide versatility for a variety of clinical examinations.
2. Pneumatic Otoscopes:
Testing Tympanic Membrane Mobility: Pneumatic otoscopes include a bulb that can puff
air into the ear canal to test the mobility of the tympanic membrane, which is useful for
diagnosing middle ear conditions like effusion or infection.
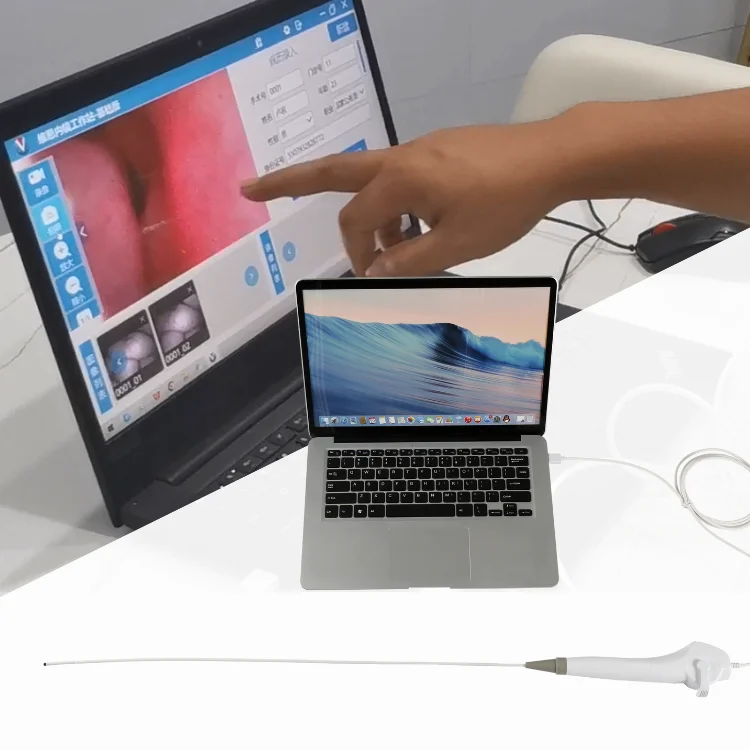
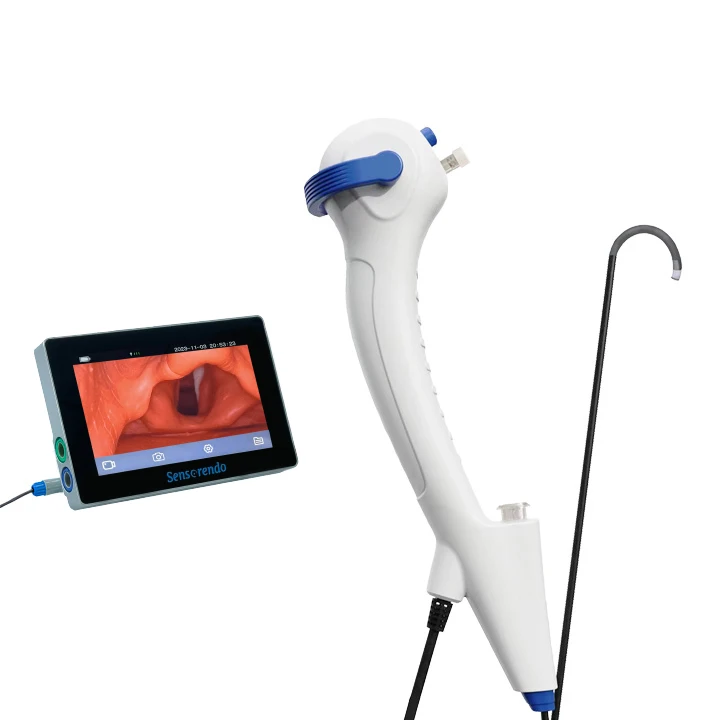
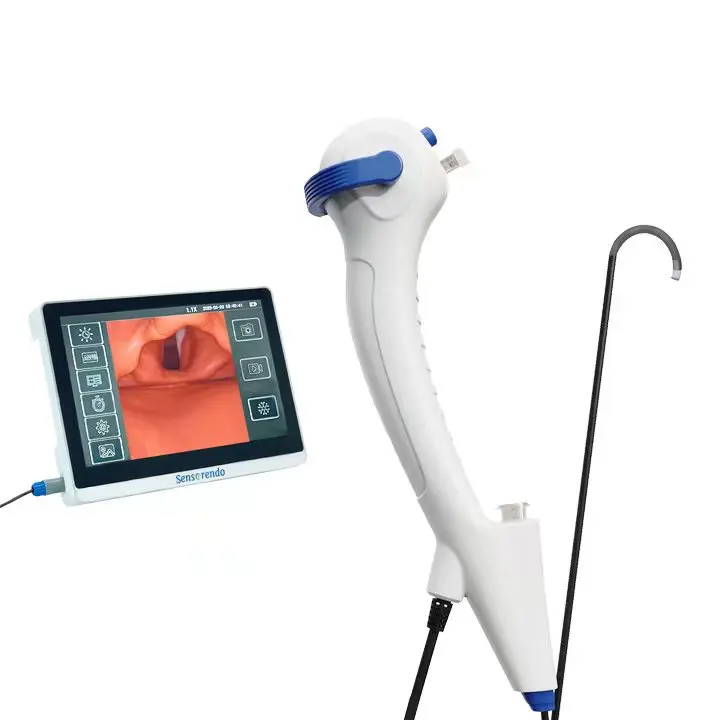
3. Video Otoscopes:
Enhanced Visualization: Video otoscopes include a camera and can be connected to a
monitor, allowing for enhanced visualization of the ear canal and tympanic membrane. They are
also useful for patient education and telemedicine.
Example of Other Examination Tools in Diagnostic Sets
1. Ophthalmoscope:
Used to examine the interior structures of the eye, including the retina, optic disc, and blood
vessels.
2. Dermatoscope:
They are used to examine skin lesions and moles with high magnification and lighting.
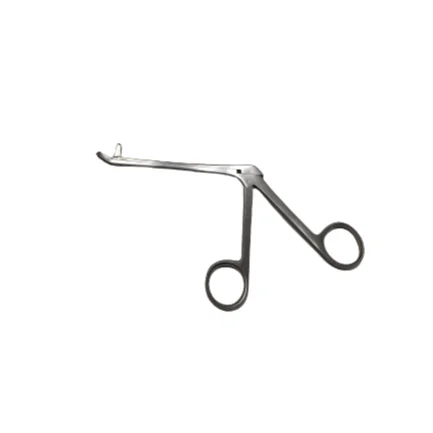
3. Nasal Speculum:
An attachment for nasal examinations is used to widen the nasal passages for better visibility.
4. Tongue Depressor with Light:
Some sets include a lighted handle that can be used with a tongue depressor for better
visualization of the throat.
The magnification power of the lens in an otoscope typically ranges from 2x to 4x. Most standard
Benefits of MultiFunction Diagnostic Tools
Versatility: Allows healthcare providers to conduct comprehensive examinations with a
a single device or set of tools.
CostEffectiveness:Reduces the need to purchase multiple separate devices, saving costs.
Convenience: Enhances efficiency by having multiple examination capabilities in one
portable kit.
Conclusion
While an otoscope is primarily designed for ear examinations, its utility can be extended to other
areas such as nasal and throat examinations, especially when part of a diagnostic set with
interchangeable heads. This versatility makes it a valuable tool in various clinical settings,
enabling comprehensive patient assessments with a single device.
1. Withdraw the Otoscope: Carefully remove the otoscope from the ear canal.
2. Repeat on the Other Ear: Conduct the same examination on the other ear.
3. Document Findings: Record your observations and any abnormalities found during the
examination.
We Recommend
New Arrivals
New products from manufacturers at wholesale prices