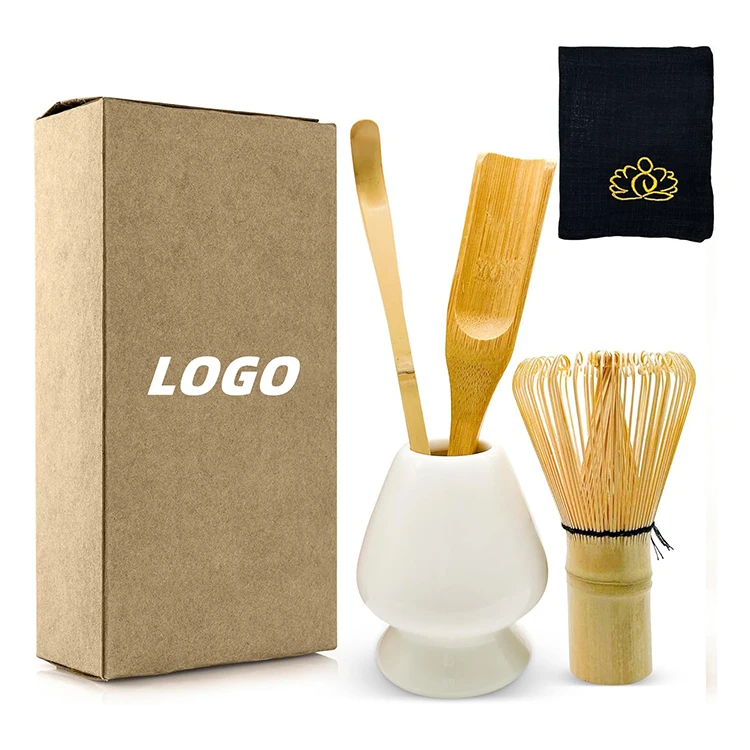


Product Overview
Description
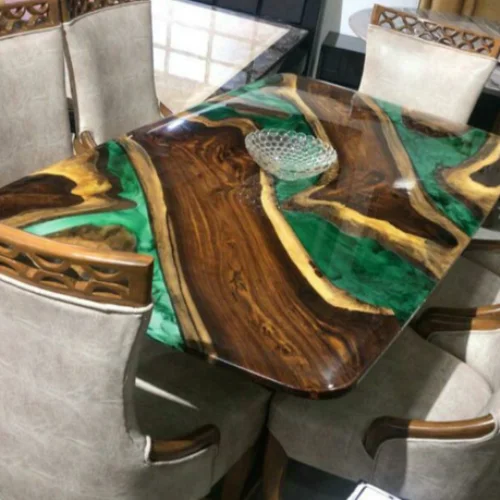
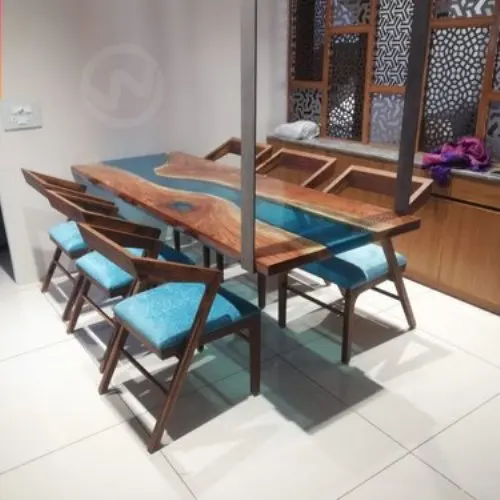
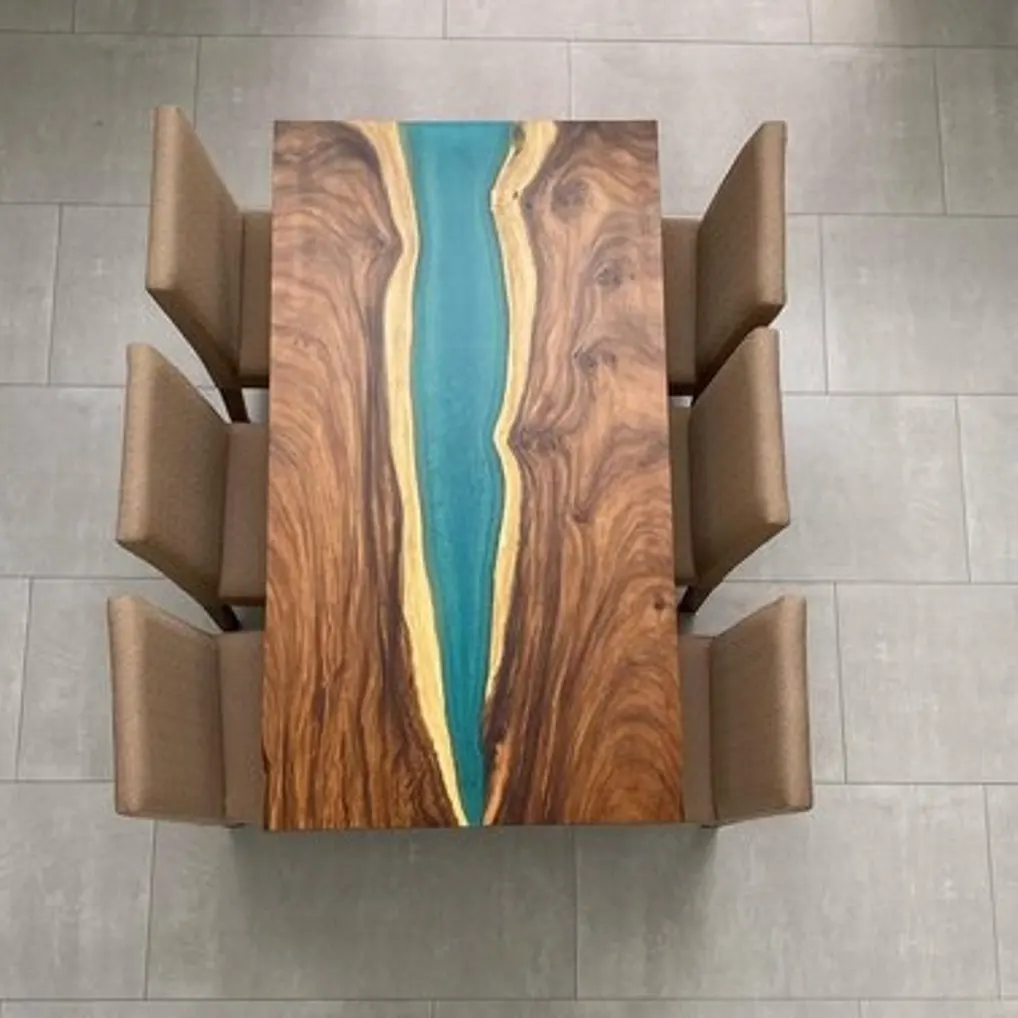
Diy Resin Dining Table Epoxy Resin Table
Live-Edge Epoxy Resin Tables are beautiful pieces of tables made by trends artisan of jodhpur with the use of live edge solid wood plank and high end epoxy. Different kind of table legs always looks really nice.
We make many kind of table top and table legs so it give a you lot of options to you and below is our process.
Step 1: Preparation and Materials
The Live edge Plank and Materials used in the project:
· Solid wood live edge plank
· Epoxy and hardener
· Sanding paper
· Translucent Tinting Pigments - we used blue
Tape - flash/release and double-sided
It's very important that the environment you are working in is dust free, a dry, heated space with an ambient temperature of around 20°C to 30 throughout the process.
Step 2: Selecting and Preparing the Wood
We choose wood seasoned, dry and as flat as possible.
The style and type of the wood is a personal choice of buyer- although interesting grains and waney-edges work best for this type of project.
wood to create the river channel and remove any bark from the live-edge. This will allow the resin to bond to the solid wood and the finished table will be mechanically strong.
Use a chisel to remove the bark and then rub down with abrasive paper to remove any loose material, then wipe or vacuum any dirt and dust from the wood.
Step 3: Sealing the Wood and Filling the Knots
· Next you need to check for cracks, knotholes and gaps on both the top and bottom of the pieces of wood and fill these with resin to seal them
· Use some tape to seal the cracks and gaps to prevent resin running out- a release tape works well for this.
· Measure and mix a small amount of resin and pour into any gaps - make sure you check on this after a few hours to see if it needs topping up as the wood will probably absorb some of the resin.
· Overfill the gaps slightly with resin and then leave to cure fully following the instructions.
Step 4: Creating a Container
Now position your slabs of wood and allow for your river channel so we make a container around the whole table slab - this will support the resin whilst pouring and curing (the river):
· Begin with a flat sheet - something like mdf or chipboard which is just slightly larger that the slab you will be producing which will make a baseboard to work upon.
· Next using a suitable product (we used polypropylene sheet as the resin doesn't stick to it) cut a base and side barriers to create a container around the wood. Make the base approximately 8cm larger than the table size to allow for side barriers and battens (if required).
· Using a hot-melt glue-gun run a bead of glue all around the base and side barrier joins to make sure the container is water-tight.
· Test it's watertight but make sure you dry the container thoroughly.
Step 5: Resin - Measuring, Adding Colour and Pouring
Buyerl taste will dictate whether or not you choose to tint or colour your resin or leave it clear. Lots of makers are using glow powders, metallic pigments, solid colours and embedding things in their resin rivers and we would recommend thorough testing in a small amount of resin with any effect you want to achieve before attempting your table.
We used a blue translucent tinting pigment in our resin to achieve the watery effect in our table.
Measuring & Colouring
· Following the instructions measure or weigh out the resin - enough for the total project to ensure consistentcy.
· Add the colour pigment to the resin - a little goes a long way so add a couple of drops at a time and mix thoroughly.
Step 6: Pour Base Layer and Allow to Reach the B-Stage
We pouring a base layer to seal the underside of the wood - this will help to minimise air bubbles during the main pour.
· Make sure the resin completely covers the whole base area
· Place the wood planks back into the correct position on top of the resin
· Using a brush seal the waney-edge and top surface with resin including filling any knots, splits or cracks
Step 7: Pour River Layer 1
Once the B-stage has been reached on the base/sealing layer you need to prepare the resin for Layer 1:
· Measure out the pre-pigmented resin and measure out and mix in the correct amount of hardener
· Transfer to a 2nd pot and mix again
· Pour the resin into the river channel
Step 8: Pour River Layer 2
Repeat the stages again for the 2nd main pour once the B-stage has been reached on part 1:
Measure - Mix - Pour - Heat-Gun
If required, repeat the process until the river is full - remembering to double pot the mixes and if pouring multiple layers wait for the B-stage before mixing and pouring the next layer.
Aim to slightly overfill the river channel, then leave the resin to fully cure!
Step 9: Routing & Sanding
To finish the table in the project we used a router set up over the slab on a bridge as we didn't have access to a drum sander or thicknesser and routed the surface all over by making multiple passes.
This gave us a flat, even surface of equal thickness all over and we were then able to sand the surface using a hand-held sander and working through the coarse to smooth grits to achieve a beautiful finish over the wood and resin.
We worked our way through 120, 240, 400, 800 and 1200 grits and made sure all scratches were removed from the previous grit at each stage before progressing to the next one. If this isn't done correctly there will be tiny scratches visible in the final polish and the sanding process will have to be repeated.
Step 10: Making and Attaching Sides/Legs
to create a waterfall effect on the sides to add more interest to the piece.
This was done by:
· Measuring the slab and marking off the 2 sides/legs
· To do this we masked off the areas immediately around the joint with flash/release tape to limit any overspill and create a hinge which helped guide the two sides together correctly
· Then we applied the adhesive to the outside of the joint so that when it was squeezed together it filled the joint evenly and fully
· Then we supported and clamped the sides into place to support the angle during the cure and left it until fully cured, then removed the tape
Step 11: Polishing
To finish off the table you will need to seal the wood - we can choose the look you want to achieve - we used a clear Danish Oil and rubbed it in using a lint free wipe, then allowed it to soak in and dry.
Step 12: That's How You Make a Live-Edge Epoxy Resin River Table!
That's how we made our Epoxy Resin River Table!
You can see from the images that the river is so glossy and the blue pigment looks so water-like.


Making epoxy resin table our passion and we do this with full dedication with our experience quality control team and for the first step we make epoxy table tops s per requirement of the buyer and with the use of lovely industrial table base to make epoxy table.
Epoxy dining tables is most demanding product of for your home or we can use this as well in hotels, office and café.
table epoxy with live edge or mdf with sea effect looks really nice.
You will love our epoxy table luxury collection we do regular export for different countries.
We also have wide range of epoxy coffee table or we can say epoxy center table
Normally we make epoxy river table with cnc or live edge but we can also do epoxy resin table top with carving on the top.
table epoxy wood
round dining table 8 seater epoxy
resin epoxy table
kitchen table epoxy
epoxy resin table mold
resin epoxy decor table
wooden epoxy table
epoxy table wood
epoxy resin glue table
epoxy table solid wood
river table epoxy resin
table rivière epoxy
epoxy table black rond
epoxy resin river table
clear epoxy table
epoxy wood table
table en resine epoxy
wholesale adhesive floor painting coating epoxi resin table price liquid clear two part ab component floor clear epoxy resin
table epoxy bois
walnut epoxy table
resina epoxi table
epoxy dinner table
epoxy table resin
epoxy resin kitchen table
epoxy resin wood table
wood epoxy round dinning table
epoxy form table
epoxy table machine
table top epoxy
epoxy tables custom
table round epoxi black
epoxy river dining table
wood epoxy square dinning table
epoxy resin table solid wood
epoxy blue river side table
Epoxy resin table chair supplier
wood epoxy dining table set
factories only make resin epoxy dining table
folding table epoxy
outdoor epoxy table
table epoxy resin
epoxy dinning table
clear table top epoxy
epoxy resin dining table
epoxy resin table crystal clear
wood epoxy resin table lamp
epoxy resin dining table price
woods table epoxy
table epoxy furniture
dinning table epoxy
epoxy coffe table
coffee table epoxy
epoxy ocean table
top table epoxy
epoxy table molds
epoxy resin coffee table
epoxy resin table nest
epoxy table wood furniture
table haute en epoxy
epoxy resin mold for table
burnt wood with epoxy table
epoxy resin river table 3d
table salle à manger en epoxy
tools to make a epoxy table
bois pour fabriquer une table en epoxy
epoxy aluminum table cotting epoxy
crystal epoxy resin epoxy prices dining table
crystal clear epoxy resin for epoxy table top
epoxy resin river table table
wood slabs table and epoxy resin tables
epoxy mold table
all epoxy table
table en epoxy
table resin epoxy
epoxy tea table
epoxy table dining
epoxy wave table
table of epoxy
epoxy table trade
rubber table epoxy
epoxy table ocean
table dinning epoxy
charred wood table epoxy
top table epoxy resins
wood epoxy resin table
table ronde bois epoxy
epoxy resin table manufacturers
mold silicone epoxy table
epoxy dining room table
epoxy resin harner table
wood for epoxy tables
table epoxy for sale
epoxy wood table top
table epoxy resin molds
tables of epoxy resin
epoxi tabl de surf
all epoxy table dinning
epoxy resin table maken
river table epoxy resin molds
epoxy table dining 8 peoples
epoxy resin table top wood
epoxy resin table top.
clear table top epoxy resin
epoxy resin wood slab table
live edge lake epoxy table
epoxy dinning table 8 people
epoxy resin table lamp custom made
epoxy resin river table crystal clear
large epoxy resin molds for tables
table top centrifugal syringe epoxy mixer
resina epoxy incolor baixa viscosidade table
foshan leroy epoxy resin dinning table
epoxy resin experimental table top
silicone table mold for epoxy resin
table à manger epoxy bois clair
blue epoxy resin river wooden dinning table
walnut solid wood material table epoxy resin
epoxy resin for wood table and foundry
table à manger epoxy bleu et bois clair
bois au detail pour fabriquer une table en epoxy
epoxy resin table furniture
epoxy resin dining river table
Industrial Dining Table is one our best products and it really looks really nice with different type of finish like Natural, Walnut, Teak and other kind of finish.
This is made by stone top and cast iron base our best combination
This Dining Table is good for 6 Chair and we also have option for 6, 8, 10.
All Table made by Industrial table base or wood base to make set and also we have many Chairs made by Iron and wood make this perfect.
Metal Legs of both side looks really nice and provide heavy duty with industrial vintage looks.
We don’t know how will industrial design will fit in the rest of your home. In 1800 to up 1940 since Paris many design of machines use for dining table and this design one of from them and developed mid century design for chair as well.
It will take only 15 to 30 days in production depend on the order quantity.
Find Below our advantage of this Industrial Dining Table :
1. Attractive and elegant design from Industrial furniture.
2. Easy to Fit with Industrial chair .
3. Base size can be adjusted with the use of labeller
4. Quality is very good and durable
5. Made by trend artisan of jodhpur
6. High quality PU and deco paint
Our Other range is below –
Cast Iron Table Base
Industrial, vintage furniture
Chesterfield leather sofa
Epoxy wood table
Indian Bone Inlay Furniture
Aviator Furniture
Metal furniture
Mango, sheesham, Acacia wood furniture
Jodhpur Handicrafts
Hotel, cafe, restaurant and Bar furniture
Office and Home furniture
Dining Table
Country wise our performance
United States customer is regularly buying Different kind of Table base and Crank Furniture.
We do regular exports of Industrial Dining Table For Canada
Australia our main market for Bone Inlay Furniture
Netherlands is good for Full range of Aviator furniture and we do near about 25 design for a single customer of Rotterdam
France customer is regular Importing Aviator Coffee Table Regular
United Kingdom is main market for Industrial Furniture
We already did many project of cafe in Germany
Many customer of Russian Federation selling of Restaurant table Chairs.
Italy is importing Epoxy resin River table with us.
Mexico – doing live edge tables.
Spain
Israel
We Recommend


New Arrivals
New products from manufacturers at wholesale prices