Streaming/Podcasting/Recording Multi functional Audio Interface
- Category: >>>
- Supplier: Shenzhen Commlite Technology Co. Ltd.
Share on (1600993063880):
Product Overview
Description

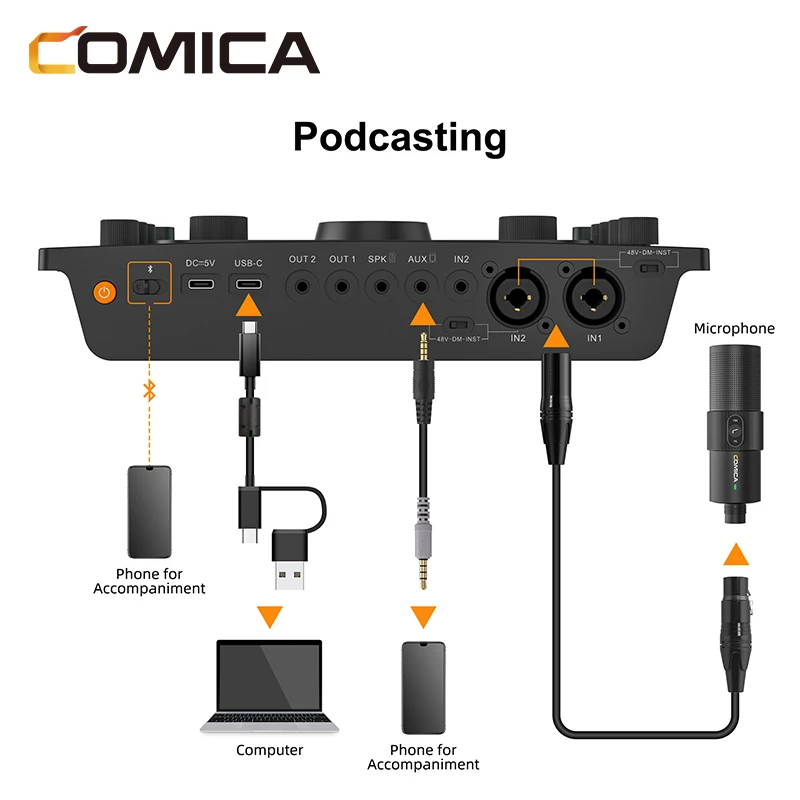
Connection and Usage
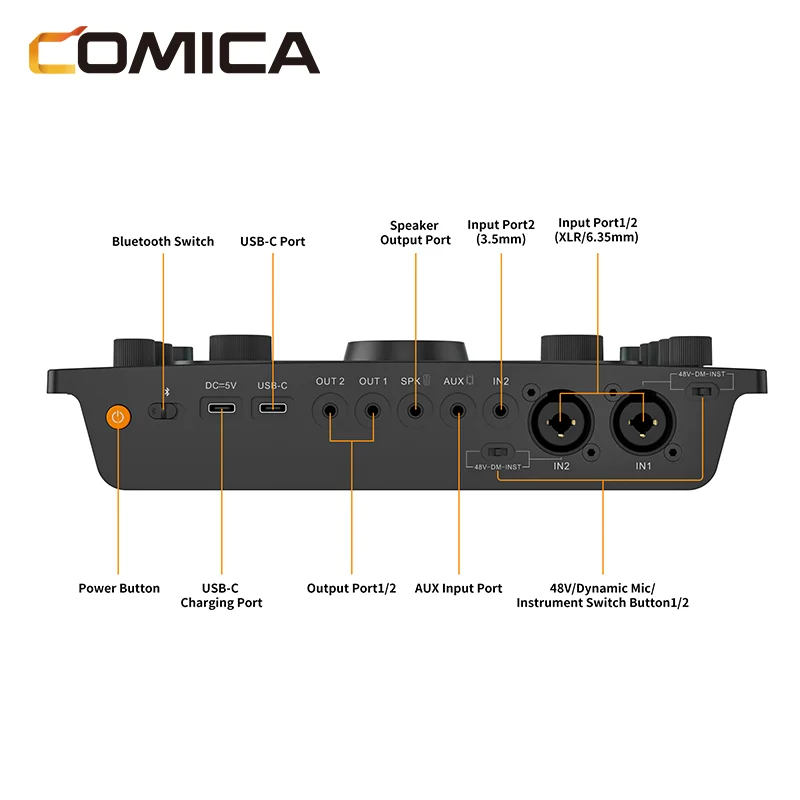
1. Connect Microphones
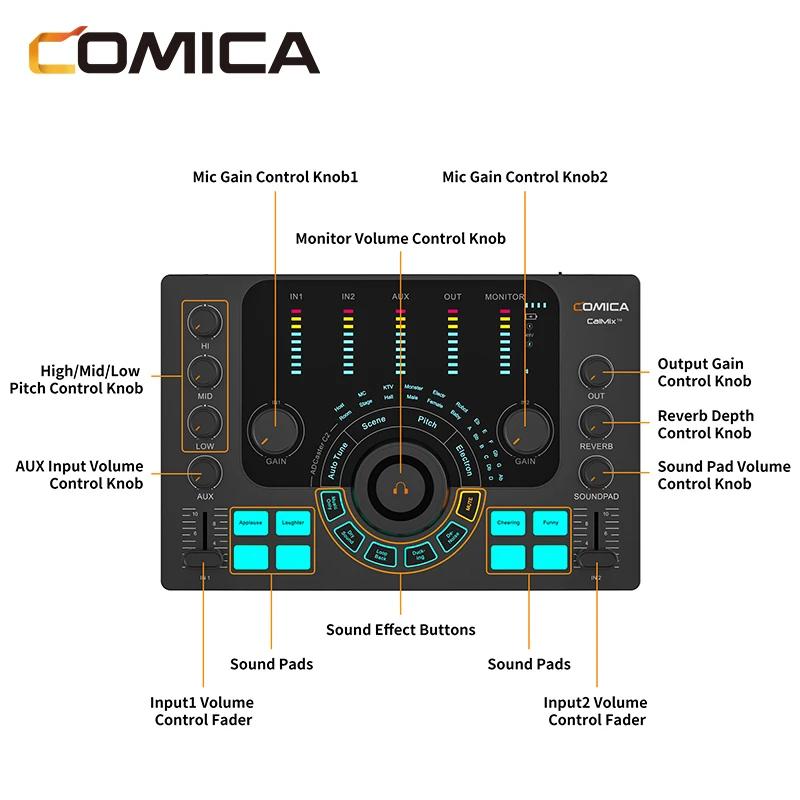
Connect XLR/6.35mm microphones to ADCaster C2 via Input Port1/2 (XLR/6.35mm) (Please switch on the 48V phantom power when using mics powered by it); connect 3.5mm microphones to ADCaster C2 via Input Port2(3.5mm) and rotate the Mic Gain Control Knob1/2 to adjust the gain of mic1/2
1.1Please turn off the 48V phantom power before connecting/disconnecting microphones to avoid damage to the mics
2.When connecting mics not requiring 48V phantom power, please make sure to turn off 48V phantom power to avoid damage to the mics
1.2 Connect Instruments
Connect 6.35mm instruments to ADCaster C2 via Input Port1/2(XLR/6.35mm) and rotate the Mic Gain Control Knob1/2 to adjust the gain of the instrument input
3.External Audio Input
3.1 Wired Input
Connect ADCaster C2 to smartphone/computer via Output Port1/2/AUX Input Port/USB-C port to input audio signals and turn the AUX Input Volume Control Knob to adjust the volume or adjust the volume on the input devices (The volume of audio signals input via Output Port1/2 can only be adjusted on the input devices.)
3.2 Bluetooth Input
Connect ADCaster C2 to smartphone via Bluetooth to input audio signals and turn the AUX Input Volume Control Knob to adjust the volume
Pairing Method: Turn on Bluetooth of ADCaster C2 and smartphone, search for ‘Comica_ADCaster C2’ on the smartphone and click to connect. The Bluetooth input can be used after paired
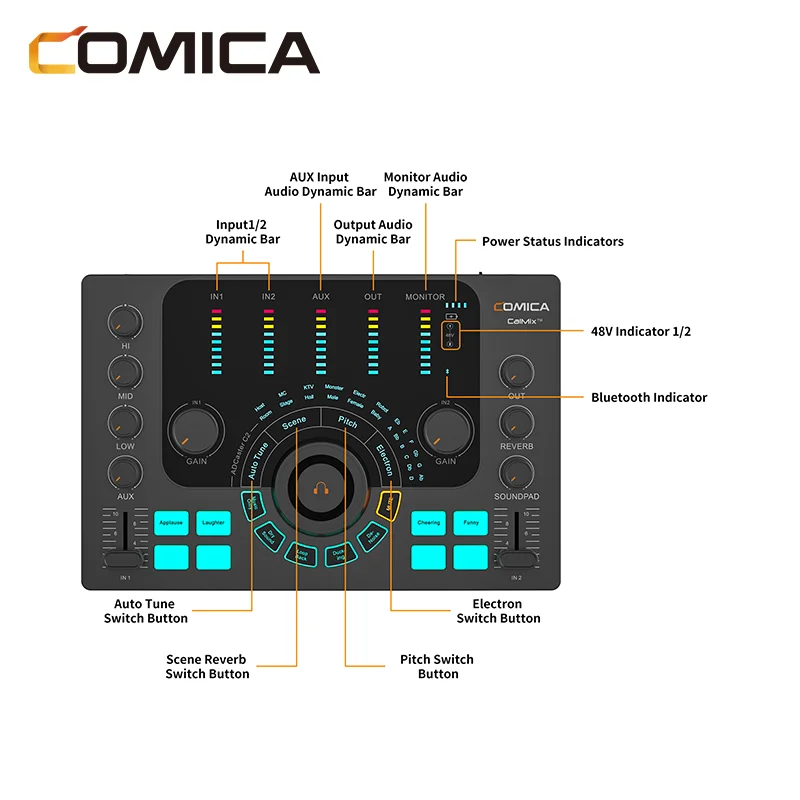
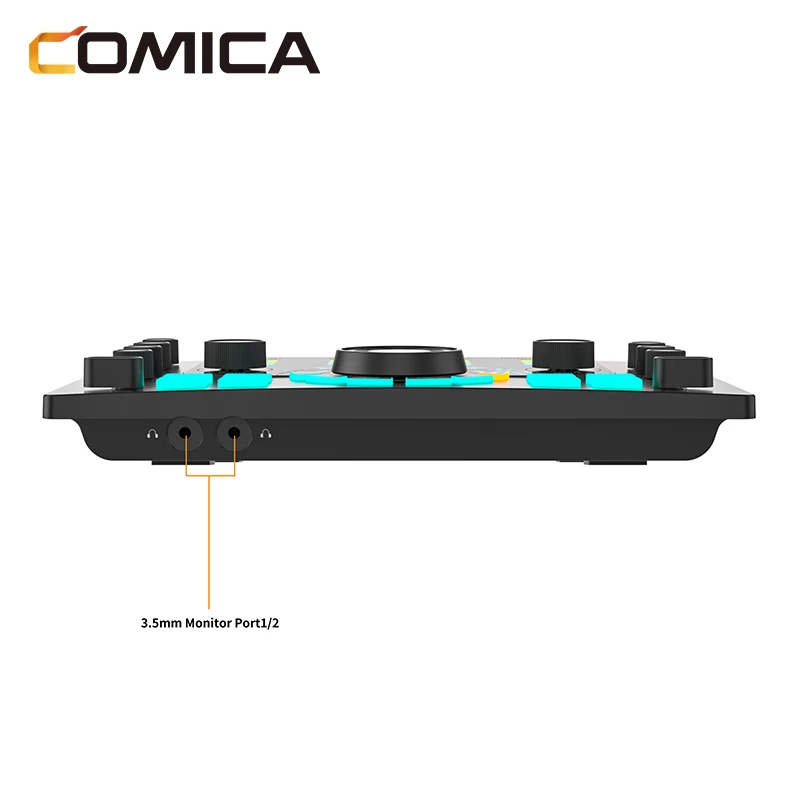
4. Connect Monitoring Headphones
ADCaster C2 has dual 3.5mm headphone monitor ports. Connect TRS/TRRS headphone to monitor and turn the Monitor Volume Control Knob to adjust monitor volume
5. Connect Speakers
Connect speakers to ADCaster C2 via 3.5mm Speaker Output Port and turn the Output Gain Control Knob to adjust the output volume
6. Connect Smartphone/Computer
Connect ADCaster C2 to smartphone/computer via USB-C Port/Output Port1/2 and turn the Output Gain Control Knob to adjust the output volume
DAW Software Setting:
When Recording with Digital Audio Workshop, please follow the instructions below to set up (Take Cubase and ProTools as examples)
Cubase
1. Please download and install the driver ASIO4ALL in advance
2. Connect ADCaster C2 to the computer, open Cubase, and create a new project
3. Click ‘Devices - Device Setup’. Select ‘VST Audio System - ASIO4ALL v2’
4. Click ‘ASIO4ALL v2 - Control Panel’ to activate the ‘ADCaster C2’ input/output port (click to lighten the power and play icons)
Usage Scenes:
1. Podcast on Computer
1.1 Connect microphone, monitoring headphones to ADCaster C2 according to the diagram above
1.2 Connect computer and ADCaster C2 via 2-in-1 audio cable. Computer will automatically recognize ADCaster C2 and match the driver
1.3 Click “Windows Settings - System - Sound”, set “Comica_ADCaster C2” as the default input/output device of the computer
1.4 Open your chosen recording application and check if “Comica_ADCaster C2” is the default audio/playback device
1.5 Record your podcast audio
1.6 Export and upload your audio to podcast platform
Up to three mics can be connected to ADCaster C2 at the same time, including one 3.5mm mic and two XLR/6.35mm mics. Please connect mics according to your need
2. Live Streaming on Computer
2.1 Connect accompaniment smartphone, microphone, monitoring headphones to ADCaster C2 according to the diagram above
2.2 Connect computer and ADCaster C2 via 2-in-1 audio cable. Computer will automatically recognize ADCaster C2 and match the driver
2.3 Click “Windows Settings - System - Sound”, set “Comica_ADCaster C2” as the default input/output device of the computer
2.4 Open the live streaming software on computer and check if “Comica_ADCaster C2” is the default audio/playback device
3. Live Streaming on Smartphone
3.1 Connect live streaming smartphone, accompaniment smartphone, microphone, monitoring headphones to ADCaster C2 according to the diagram above
3.2 Turn on ADCaster C2 and select the sound effects needed
3.3 Open a live streaming app on the smartphone and start streaming
4. Gaming on Computer
4.1 Connect microphone, monitoring headphones to ADCaster C2 according to the diagram above
4.2 Connect computer and ADCaster C2 via 2-in-1 audio cable. Computer will automatically recognize ADCaster C2 and match the driver
4.3 Click “Windows Settings - System - Sound”, set “Comica_ADCaster C2” as the default input/output device of the computer
4.4 Open your chosen game live application and check if “Comica_ADCaster C2” is the default audio/playback device
4.5 Start your game live streaming
Specifications
Interface | |
Input Port | 2 x XLR/6.35mm, 1 x 3.5mm |
AUX Port | 1 x 3.5mm |
Digital Port | 1 x USB-C |
OUT Port | 2 x 3.5mm |
SPK Output | 1 x 3.5mm |
Headphone Output | 2 x 3.5mm |
Audio Resolution | |
Sample Rate | 48kHz |
Bit Depth | 24bit |
Microphone Input | |
Dynamic Range | 100dB(A-weighted,as per IEC651) |
Frequency Responce | 20Hz ~ 20kHz, ±0.1dB |
THD+N | 0.003%, 1kHz, -3dBFS, 22Hz/22kHz BPF |
Equivalent Noise | -130dBu(A-weighted,as per IEC651) |
Input Impedance | 5kΩ |
Maximum Input Level | -4dBu |
Gain Range | 6dB ~ 60dB |
Instrument Input | |
Dynamic Range | 100dB(A-weighted,as per IEC651) |
Frequency Responce | 20Hz ~ 20kHz, ±0.1dB |
THD+N | 0.003%, 1kHz, -3dBFS, 22Hz/22kHz BPF |
Equivalent Noise | -130dBu(A-weighted,as per IEC651) |
Input Impedance | 50kΩ |
Maximum Input Level | 4dBu |
Gain Range | 0dB ~ 30dB |
SPK Output | |
Dynamic Range | 100dB(A-weighted,as per IEC651) |
Frequency Responce | 20Hz ~ 20kHz, ±1dB |
Output Impedance | 600Ω |
Maximum Output Level | 4dBu |
Headphone Output | |
Dynamic Range | 100dB(A-weighted,as per IEC651) |
Frequency Responce | 20Hz ~ 20kHz, ±1dB |
Output Impedance | 6Ω |
Maximum Output Level | 4dBu |
Others | |
Battery | Lithium Battery 2900mAh 3.7V |
Standby Time | With 48V Phantom Power on: 6Hours |
Charging | USB-C 5V2A |
Phantom Power Output | 48V±2V |
Net Weight | 670g |
Dimension | 239*158*51mm |
Working Temperature | 0℃ ~ 50℃ |
Storage Temperature | -20℃ ~ 60℃ |
We Recommend

New Arrivals
New products from manufacturers at wholesale prices